If, like me, you have a bunch of Google accounts and you don't use all of them frequently, you'll be interested to know that Google has a handy utility called "Inactive Account Manager" which does exactly what its name says it does.
Basically, it offers you a couple of ways to handle your inactive accounts, including sharing associated data with your trusted contacts and even enabling self-destruct on it. There could be multiple reasons you would want to do this, including some morbid ones similar to what Facebook introduced a while back.
My personal motivation for setting this up is that I have multiple Google accounts apart from my primary one, which I have created in the past decade or so for numerous reasons such as having a secondary account, an account to prank people, an account I don't use anymore because of its silly username, and more. In the past, I have likely used these accounts for signing up to online platforms and services but do I still need them? I'm not so sure. But since I'm not 100% sure of either option, Google's Inactive Account Manager is a nifty tool that I can use to ensure that I really don't need some accounts anymore. The company uses information about your last sign-ins, your online activity, your usage of Gmail, and Android check-ins to validate the activity status of your account.
But of course everyone would have their own reasons for utilizing this capability, and for many, it may be completely unnecessary. However, if you belong to the former group, read on to find out how to enable this functionality for your account as well!

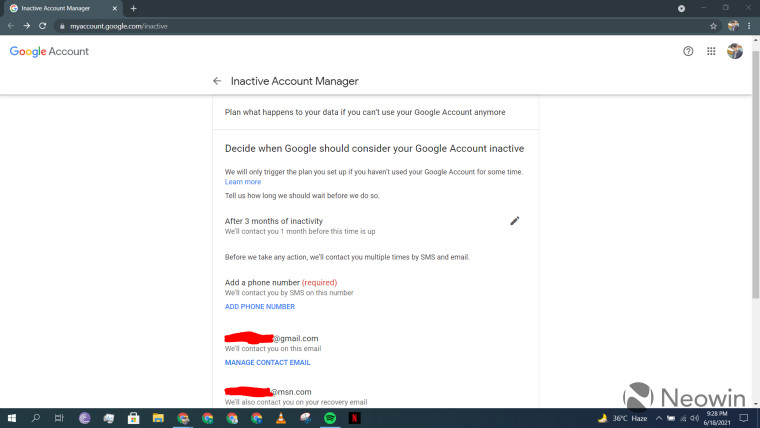
First, you need to sign into your Google account and head over to the Inactive Account Manager here. Click on "Start" which will kickstart the configuration process. In the first step (screenshot above), you will have to enable the "inactive" time period that Google should consider for your account before it triggers its inactivity plan which you are yet to configure. Unfortunately, the only options available are 3, 6, 12, and 18 months, and there is no way to define a custom value.
You will also be required to set up your phone number and a couple of email addresses. Google will contact you multiple times via SMS and email before it triggers your inactivity plan, should the day ever arrive. If you chose "3 months" in the inactivity section, Google will start contacting you one month before the trigger, if you selected "6 months", it will contact you two months prior, and if you selected 12 or 18 months, it will chase you three months prior to expiration. Click on "Next" after you're done.

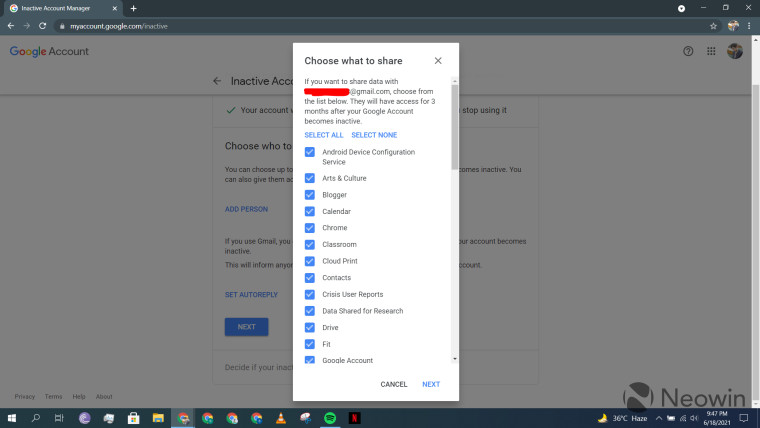
This brings you to the step where you can add up to 10 people to inform in case your account expires. You also have the ability to share a lot of your Google account data with them, and a subset of it can be seen in the screenshot above. You can choose to practically share all of your data or none of it. People you share data with will be able to access it for up to three months after your account is considered inactive. These "trusted" contacts will be sent a link via email through which they'll be able to download the data you shared with them. You can also add their phone number and a personal message as a way for Google to validate that your data is actually being shared with the intended person, but this granular configuration is optional.
You can also configure an "AutoReply" that automatically sends out a predetermined response to emails addressed to you. You can also set this up to respond to people in your contacts list only.
It is important to note that this whole section is completely optional. Furthermore, no one you add will be informed of your choice until your account is eventually considered inactive. You can decide to inform no one, share no data with them, and set up AutoReply for no one, it's completely up to you. Once you've configured this section to your liking, click on "Next".

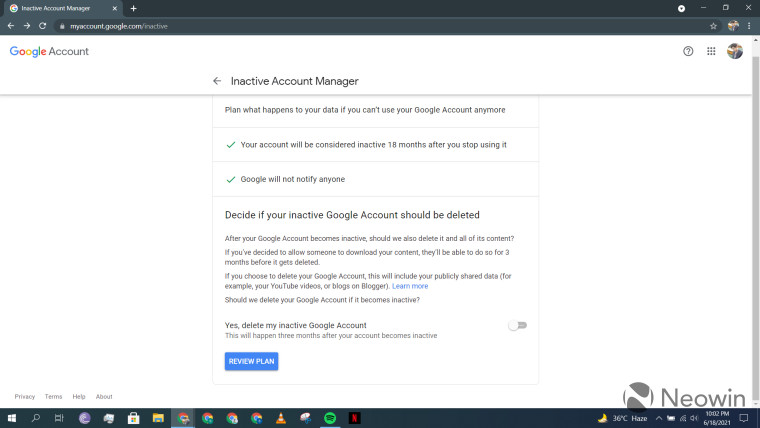
Finally, you also have the capability to enable self-destruct on your inactive Google account. It is noteworthy that all your associated data and accounts will be affected differently, and it is better to go through Google's guidance here before you do decide to pull this particular trigger. If you do enable it, your account will auto-destruct three months after it is considered inactive, during which time people who you shared any data with will also be able to download it. Another point of note is that even though your account will be deleted, no one will be able to reuse your ID which ensures that no one can impersonate you online using your exact email ID.
Once you've reached a decision, click on "Review Plan", which will show you a summary of your inactivity plan, enable you to set up email alerts reminding you that you've configured Inactive Account Manager, and confirm the plan. That's it!
Have you configured your Google account's inactivity plan or do you intend to? Did you find this guide useful? What other guides would you like to see on Neowin? Let us know in the comments section below!


2 Comments - Add comment