Beelink reached out to me and asked if I was willing to give their AMD variant of Mini PC a whirl, and I was happy to oblige. They sent along the Beelink SER6 Max, which is a pretty cool-sounding name. It has some impressive specs too, which I"ll list below.
I have bolded my configuration where relevant.
| BEELINK SER6 MAX 7735HS | ||
|---|---|---|
| Dimensions | ||
| Size | 4.96x 4.45 x 1.92 inch (126 x 113 x 49mm) | |
| Weight | 3,03 lbs / 1.37 Kg | |
| CPU | AMD Ryzen™ 7 7735HS Base 3.20 GHz boost to 4.75GHz | |
| Graphics | Radeon 680M (512MB shared memory) | |
| Memory | Dual SO-DIMM 32GB DDR5 @ 4800MHz | |
| Storage | M.2 2280 PCIe 4.0 500GB or 1TB SSD | |
| Operating System | Windows 11 Pro | |
| Audio | Realtek ALC897 | |
| Bluetooth | Bluetooth® v5.2 | |
| Ethernet | Intel® I225-V 10/100/1000/2500 Mbps RJ45 Ethernet | |
| Wireless LAN | Intel® Wi-Fi 6 AX200 (160MHz) 802.11ax | |
| Kensington Lock | No | |
| Adapter | Input: AC 100~240V,50/60Hz Output: 19V/5.26A | |
|
| ||
| I/O Ports | 1 x USB 3.2 port | |
| Color | Green, Obsidian Black, Orange, Space Grey | |
| Price | $629 (MSRP) | |
As you can see above, you can only choose a 512MB or 1TB storage option and one of the four color choices. The rest is the same across the SER6 Max series. The 1TB option is only $20 more expensive as well, which makes it a no-brainer.
The cost is a bit all over the place and depends on where you look. Although (at the time of writing) this is listed at $629 on the Beelink website, you can apply an additional $80 off coupon until Sep 23 bringing it down to $549.
On Amazon, it is listed at $669, and a further $90 coupon can be added bringing it down to $579. If you"re a Prime member it"s even cheaper at $509 ($599 plus $90 off coupon). So it pays to shop around to see which has the better deal.
The packaging is typical of a mini PC, a square box. However, this one comes with a "sleeve" you must remove first, then you can pull the top off to reveal a "Hello" card, under which is the Beelink SER6 Max wrapped in a "Thank you" message. The Mini PC can be pulled out of the plastimold enclosure with a handy piece of ribbon.
Once the Mini PC holder is removed you can find the instruction manual, cables, and other pieces listed below.
What’s In The Box
- 1 x Beelink SER6 MAX Mini PC
- 1 x Mounteing Bracket
- 2 x HDMI Cables (25cm & 100cm)
- 1 x Magnetic Adapter
- 1 x User Manual
Design
The SER6 Max design is pretty cool. There are hardly any straight edges here, with all corners rounded off. The top grill with what looks like an "S" and a "c" is slightly raised and has the texture of a grill. Under the top cover and letters, there is a hole about 2 inches in diameter which my contact tells me is the air inlet for the fan.
On the front, you have all of the connectivity options you would expect to have; a 3.5mm headphone jack, USB Type C (10 Gbps), and USB 3.2 (Gen 2). However, this means you cannot power a portable display using the front port. Oddly enough there"s also a CLR CMOS pinhole. I would have preferred such an option on the back or even on the bottom of the SER6 Max because it"s a bit of an eyesore and detracts from the otherwise nice design.
As far as looks go, it is a fully metallic dark green, almost turquoise metal exterior, although, from some of the pictures I"ve taken, it doesn"t quite capture the color well. I managed to take a picture that better captures the color, it"s the last picture in the gallery at the bottom of this review or open it here.
It"s not a fingerprint magnet. Thanks to the metal frame, it is definitely heavier than some other Mini PCs I"ve tested that had a mostly plastic construction. This thing is just shy of 1.4kg and certainly has a heft to it.
Accessing the SER6 Max is quite a task. The smallest screws were used here. If you open up the bottom left image in the above grid, you can see all of the screws laid out. Just to make things interesting, they are also different lengths and in one case a different thickness.
I had to reach out to my contact for assistance because there is no instruction on how to remove the fan module in order to access the memory and NVMe. Above, in the last image in red, are the screws that I identified, and the yellow boxes are what my contact showed me. Those screws were quite a way down, just like the bottom right screw that is visible in the above pic, but should not be removed, as that holds the motherboard in place.
So, if you will be purchasing this, do make a note of which screw goes where, and do have a magnetic screwdriver, because, in a couple of places, the screws are far down in the corners.
One very useful thing here is that you can attach a second NVMe SSD right below the bottom metal plate, which avoids you having to take the whole thing apart to access the other NVMe slot and the memory. It"s the kind of thing you might only do once, or after a few years, but I wish manufacturers would make it easy, not hard, for customers to do their own upgrades.
Usage
The Good,
On first boot, you are prompted to complete the setup of Windows 11 Pro, meaning you do not have to fork out for a license, which is nice.
After the setup is completed, I am happy to report that the SER6 Max does not come with any bloatware installed. In fact, even AMD Adrenalin and the Realtek Audio console were already installed. It came with Windows 11 22H2, so the updates were pretty minimal.
I have been using the SER6 Max on a portable display, which has allowed me to have it off to the side of my main PC.
It"s physically possible to attach four screens to the SER6 Max using the HDMI and DisplayPort, and the two USB4 ports if you wanted. Regarding connectivity, there"s the 2.5 GbE RJ45 Ethernet port, two USB 2.0 ports, and another 3.5mm audio jack port along with a magnetic power connector port on the bottom plate. Around the front, there are two USB 3.2 Gen 2 ports and a port for a 3.5mm headphone jack.
the Bad
The magnetic port is a strange one. Initially, I thought, "Oh cool, if you trip over the cable, it will detach just like Magsafe!" Except it doesn"t. I can"t help feeling it is more like a gimmick, because you have to insert the magnetic connector into the port, just like you would a barrel port, and to detach it, you have to pull it out like you would a barrel port connector
On the website, it does not claim to be anything like Magsafe:
"The magnetic DC connector is on the bottom side of the SER7, making room for more ports on the back."
So I guess that"s okay. It is just a strange design decision. The above-unedited quote references the SER7 as well, something we"ve become accustomed to with Chinese ODMs, getting their specs and naming a bit in a muddle.
There"s no SD Card reader or Kensington lock. I do feel like the latter should be included on Mini PCs considering the very nature of them. You have the option of portability and taking it with you to a strange place. Why isn"t there an option to secure it as well?
and the Ugly.
I feel like a special mention is needed for the front of the SER6 Max. The CLR CMOS lettering and pinhole are just plain UGLY. And that power light indicator? Wow, it is far too bright and distracting, it is so bright that it actually throws down light onto my black Razer Gigantus mat. I think I was able to capture just what a nuisance it is from the above picture.
These two things really detract from the otherwise wonderful design and build of the SER6 Max, but they are front and center. I guess we could fix the power indicator with a bit of colored tape.
Benchmarks
With that out of the way, and because people like that sort of thing, I ran some benchmarks and compared it to my (now retired) PC which I built in 2019. The SER6 Max is running Windows 11 Professional 22H2 build 22621.2134 and came with Adrenalin Edition v23.5.2 pre-installed, I upgraded to the latest Adrenalin Edition driver which is v23.9.1 (September 2023).
My (now retired) Main PC consists of the following:
- Intel Core i9-9900K (stock)
- Gigabyte Z390 AORUS PRO WIFI (BIOS revision F12)
- 64GB DDR4-3200 G.Skill Ripjaws (16-18-18-38) dual channel
- Samsung 980 1TB NVMe
- KFA2 RTX 2070 SUPER (Nvidia driver 527.37)
- Windows 10 22H2 build 19045.2311
For the benchmarks, I used 3DMark, PCMark 10, Geekbench, and Cinebench. 3DMark Time Spy tests gaming capability with DX12 graphics performance.
PCMark tests are a mix of CPU and real-world productivity tests, such as using an office suite, web browsing, light photo/video editing, and making conference calls. Cinebench stresses the entire CPU as it is a multi-threaded rendering test. Finally, Geekbench is a synthetic benchmark that is great for a quick look at the potential performance across a wide range of workloads.
| Beelink SER6 Max Ryzen 7 7735HS | GEEKOM AS 6 Ryzen 9 6900HX | Selfbuild Core i9-9990K | |
|---|---|---|---|
| 3DMark (Time Spy) | 2,740 | 2,430 | 9,995 |
| PCMark 10 Extended test | 7,048 6,676 | 6,382 6,113 | 6,619 8,853 |
| Geekbench Single Multicore Compute (OpenCL) | 1,600 9,806 32,217 | 1,586 9,326 27,784 | 1,300 8,186 99,450 |
| Cinebench Single Multicore | 1,563 12,846 | 1,671 | 1250 |
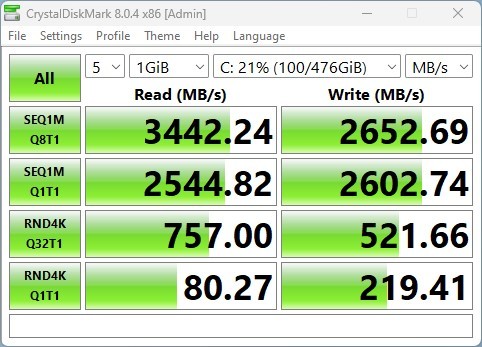
I also tested the SSD"s capability using AS SSD and CrystalDiskMark.
| AS SSD | CrystalDiskMark |
|---|---|
Despite running all of the above benchmark tests, the SER6 Max did not even get warm and there were no annoying noises coming from the fan that cools the unit.
Gaming
Beelink markets the SER6 Max as a game-capable Mini PC with snazzy graphics on its page about how CS:Go can get up to 115fps, DOTA up to 116, or PUBG between 71-92fps. Okay, but under what circumstances? And I guess everything is set too low on those games?
In Quake Champions, first released in 2018, everything is set to Low which is the exact same thing you"d expect on a laptop with Mobile-class graphics, so you should definitely keep this in mind when making a decision to purchase a Mini PC. I"ve logged over 1,500 hours in QC since I started playing it in 2018 and it is tough to play with everything set on low.
Beelink had earlier claimed that it boosts the TDP "up to 65W", but it appears this has been corrected down to a max boost of 54W on its website. But again, what are we boosting for? I feel like manufacturers should get serious about what they are claiming or stop trying to pretend it is something that it isn"t.
Conclusion
One thing that remains clear from using these Mini PCs is that they simply aren"t a gaming PC. You will not be able to enjoy graphically intensive games on them, but they absolutely are suited as an office workstation, or perhaps a good solution for a student with limited living space with the ability to pack this away after every use. This thing isn"t taking up much room. You can even screw it to the back of a screen if it has VESA support with the included mount plate.
In a world that is apparently too stingy for phone manufacturers to include a power lead and charger for their flagship phones, Beelink provides all of the cables and tools necessary to get started straight away, along with a Windows 11 Pro license.
Assuming you"ve made it this far, at just $629 MSRP, it"s still a powerful machine inside a tiny metal body. I am impressed with the build quality, but they shouldn"t really be touting this as a gaming PC. A true gaming Mini PC has NVIDIA GeForce RTX 4060 Mobile, or AMD Radeon RX 6600 discrete graphics or better, and this does not. It has integrated onboard graphics utilizing 512MB of shared memory and the CPU.
As I said earlier, you can apply an $80 off coupon on the Beelink website, until Sep 23 bringing its $629 MSRP down to just $549. On Amazon, it is currently listed at $669, and a further $90 coupon can be added bringing it down to $579. If you"re a Prime member it"s even cheaper at $509 ($599 plus $90 off coupon). So it pays to shop around to see which has the better deal.
As for if I would recommend it, absolutely, but not if you plan on switching out the system"s memory or NVMe often. It is a pain (but not impossible) to access the NVMe and memory on the motherboard. However, as I pointed out earlier in this review, there is easy access to the second NVMe slot, which is located just under the bottom plate. It"s also not possible to attach a 2.5-inch SSD internally, while a lot of the competition does offer it, so you"re stuck with just the option for two internal NVMe"s.
Our stories may contain affiliate links for products/apps where Neowin is paid an affiliate fee if you complete a purchase via those links.
Earlier this year GEEKOM reached out to me asking if I was willing to give one of its Mini PCs a whirl and I accepted if I was able to test one of its later and beefier models, seeing as it also still sells a variant with 8th gen Intel i3, i5, and i7 CPU choices for under $500. I was only really interested in benchmarking a modern Mini PC with Windows 11 installed, believing such tests would benefit our readers.
Although I"ve seen Mini PCs before (I almost bought a Mac Mini as a second PC) I have never used one, so it was a learning experience for me too.
First up, below are the full specifications of this thing. I have bolded my configuration where relevant.
| Mini IT11 11th Gen Intel Core i7/i5 | ||
|---|---|---|
| Dimensions | ||
| Size | 117 x 112 x 45.6 mm | |
| Weight | 564.9 g | |
| CPU | i7-1195G7 (4 Cores, 8 Threads, 12M Cache, up to 5.00 GHz) i7-1165G7 (4 Cores, 8 Threads, 12M Cache, up to 4.70 GHz) i5-1155G7 (4 Cores, 8 Threads, 8M Cache, up to 4.50 GHz) i5-1135G7 (4 Cores, 8 Threads, 8M Cache, up to 4.20 GHz) | |
| Graphics | Intel® Iris® Xe with 96 EU | |
| Memory | Dual-channel DDR4 SODIMM, 16GB; expandable up to 64GB | |
| Storage | 1 x SSD (2280 M.2 SATA/PCIe), 512GB; expandable up to 2TB 1 x 2.5" SATA HDD (7mm), expandable up to 2TB | |
| Operating System | Windows 11 Pro | |
| Bluetooth | Bluetooth® v5.2 | |
| Ethernet | Intel® 10/100/1000 Mbps Ethernet | |
| Wireless LAN | Intel® Wi-Fi 6, AX201 (CNVI) | |
| Kensington Lock | Yes | |
| Adapter | Automatic Voltage adjustment between 100 and 240V AC, 50/60Hz, 3 pin, 65 Watts (19V/3.42A), 1.5 meters in length | |
|
| ||
| I/O Ports | 3 x USB 3.2 Gen 2 ports 2 x USB4 ports 1 x SD card reader 1 x 3.5 mm headphone jack 1 x RJ45 Gigabit Ethernet port 1 x HDMI 2.0 port 1 x Mini DisplayPort 1 x DC jack 1 x Power button | |
| Price | $649 ($589 until Dec 30 with promo code) | |
Although this i7-1195G7 variant I am reviewing has an MSRP of $769, right now it is discounted to $649, and when you apply the XMIT11A coupon, it discounts it a further $60 bringing it down to just $589. That is not bad for an 11th gen Intel i7 PC with 16 GB of RAM, a 512 GB SSD, and USB4 connectivity.
The packaging feels very premium and the top can be pulled off to reveal the Mini PC sitting inside a foam-cushioned interior. Once you have the PC out, and the foam is removed you are greeted with a Thank You envelop, below that after removing the cardboard "shelf" you can find the other components such as the power lead, HDMI cable, VESA mount plate with a bag of screws, and the instruction manual.
What’s In The Box
- 1 x Mini IT11 Mini PC
- 1 x VESA Mount
- 1 x Power Adapter
- 1 x Storage Bag
- 1 x HDMI Cable
- 1 x User Guide
- 1 x Thank You Card
GEEKOM opted to ship an HDMI cable with the PC, unfortunately, there is no mini DisplayPort adapter, which means I had to order one because my setup is using DisplayPort via a KVM switch, and HDMI isn"t really a convenient option.
Design
The Mini PC itself has a good heft to it, it certainly is not heavy, but it isn"t light either, and it has a premium and balanced feel to it. All the edges and corners except for the bottom edges of the Mini PC are rounded, so it is comfortable to hold and move around. It is also good to see that there are two USB4 ports (Type C) one on the front and one on the back. The other three USB3 ports are also Gen 3.2, which is great.
As far as looks go, it is a fully matte exterior, so it"s not a fingerprint magnet. It also feels like aluminum, but it actually isn"t; it"s a plastic shell that covers a metal frame. It doesn"t feel cheap and isn"t flimsy either, and even when the base is removed it remains sturdy.
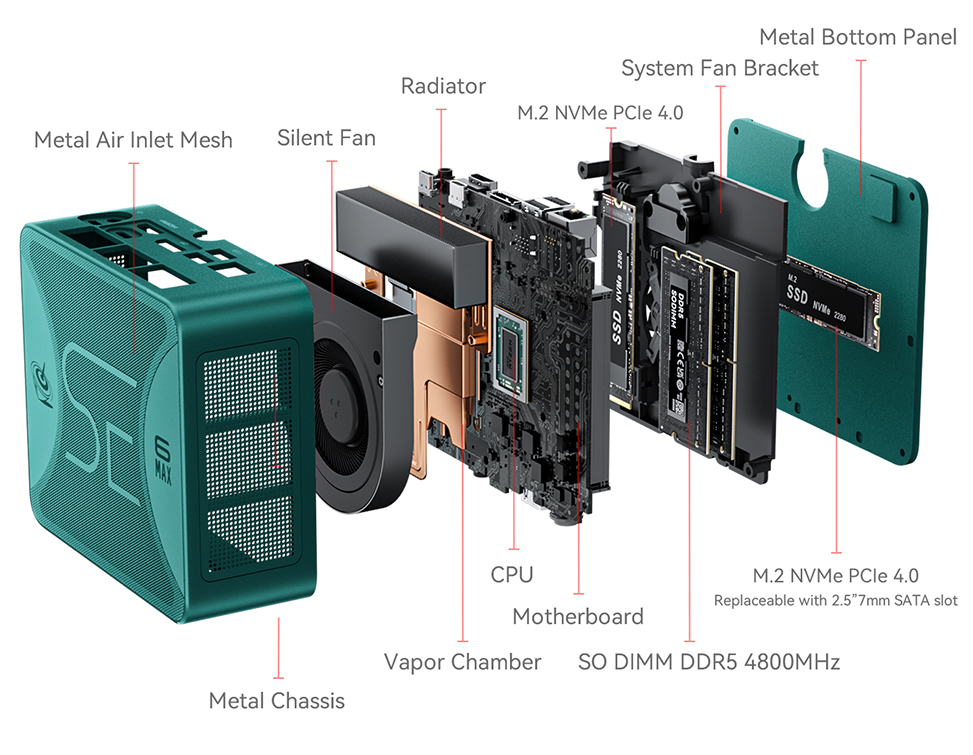
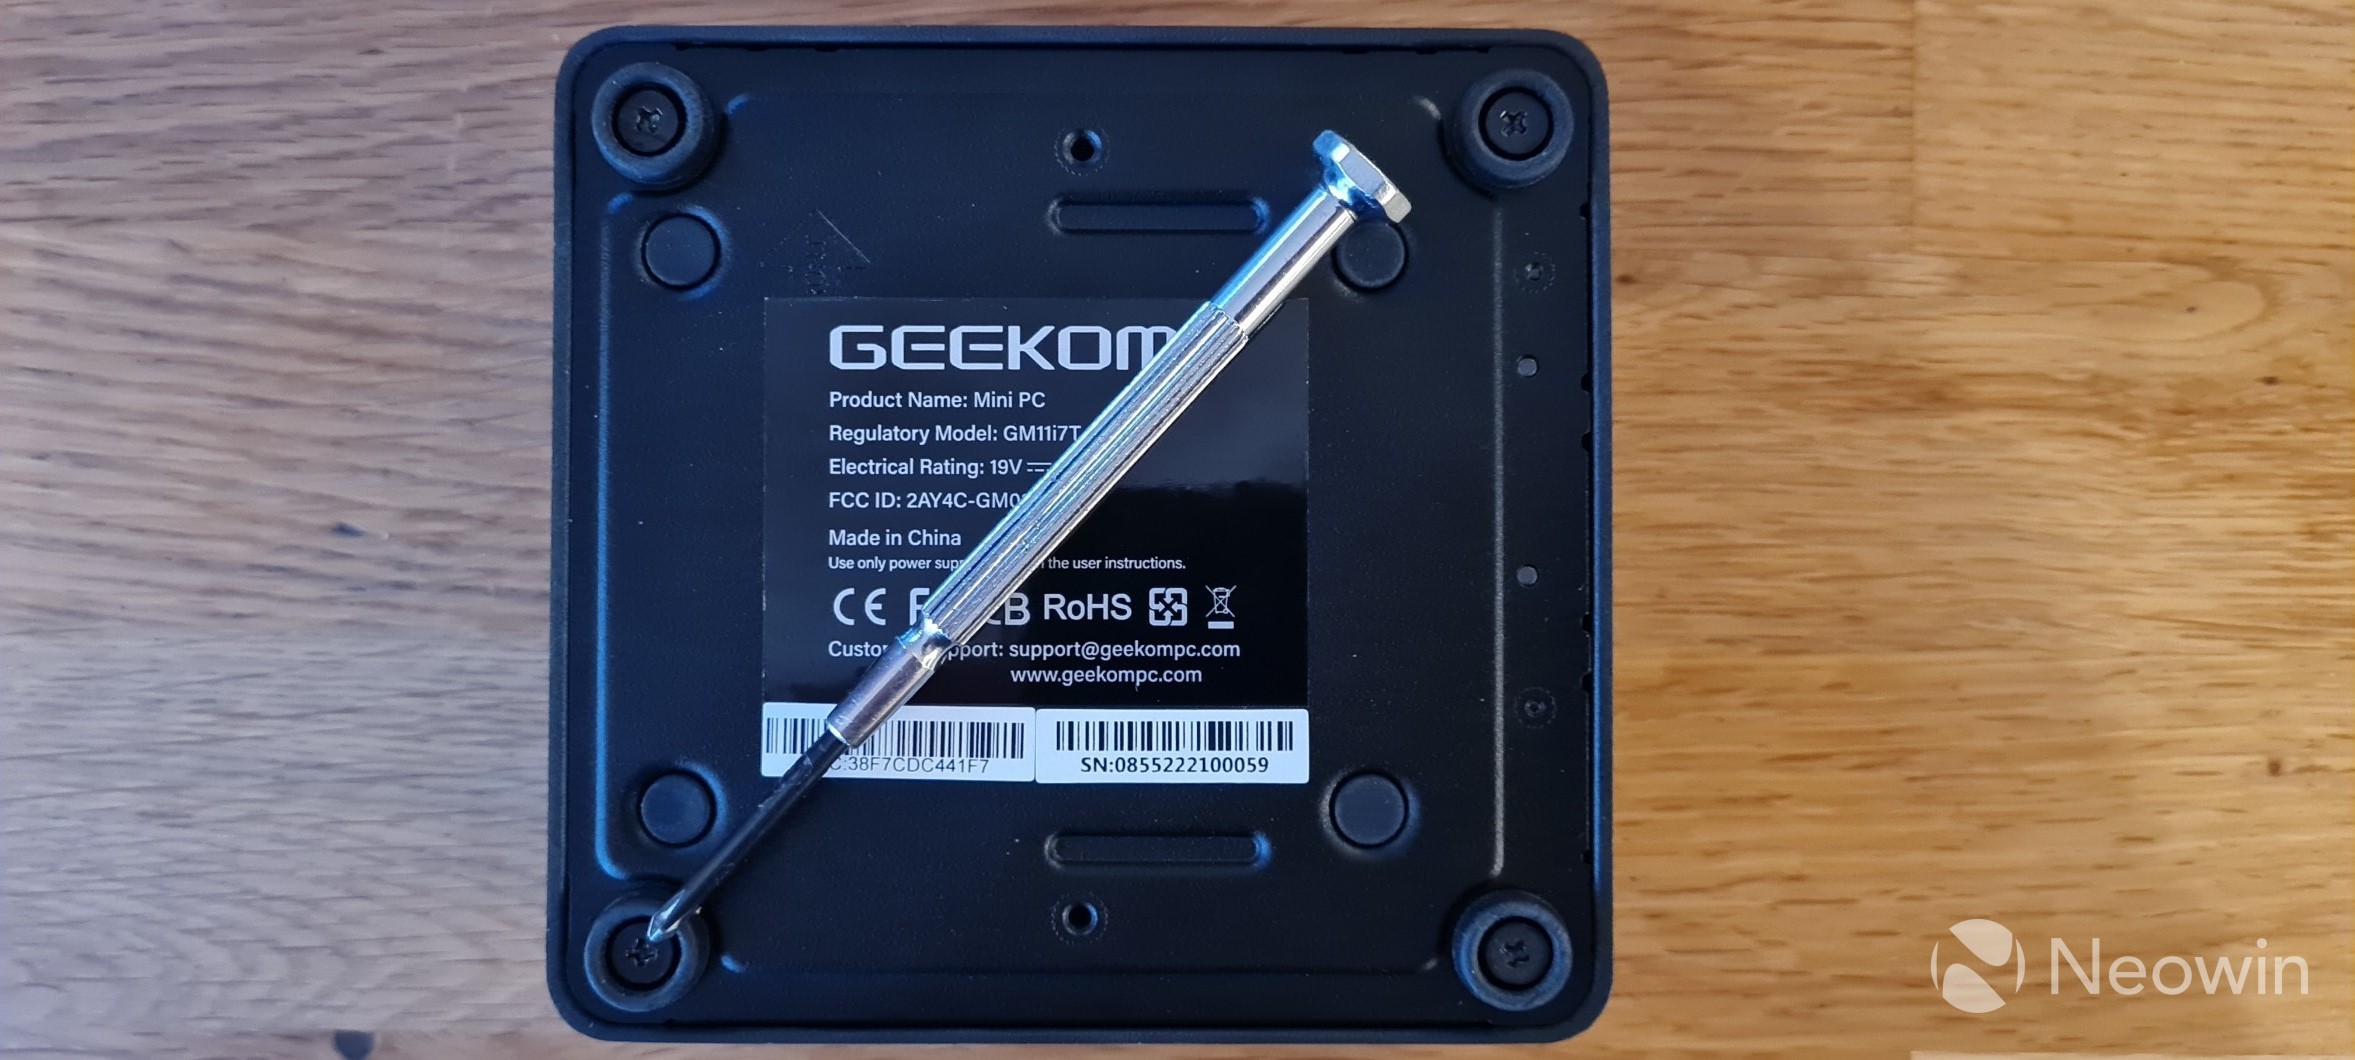
Accessing the Mini IT11 is as easy as unscrewing the bottom plate with the four Philips head screws located in the center of each rubber foot, a small hobby screwdriver is enough for the job, but you may want to use a flat head screwdriver to prise the plate free, taking care not to damage the ribbon, which is connected to a full-sized SSD connector that can be added to a sled located on the backplate. Helpfully, the screws do not come loose from the backplate so that you won"t lose them either.
As you can see from the above images which can be enlarged when clicked on, there is ample room to manage the SODIMMs and single 80mm Lexar NVMe SSD, so you can swap it out for something else if you want.
The backplate only fits back on one way, this is to ensure that the NVMe is always connected to the heat spreader.
Usage
On first boot, you are prompted to complete the setup of Windows 11 Pro, meaning you do not have to fork out for a license, which is nice. After the setup is completed, I am happy to report that the Mini IT11 does not come with any bloatware installed. It ships with the original version of Windows 11 so I had to run some updates to get me up to the current 22H2 version.
Many people may not come across this, but I will mention it in case it does help someone troubleshoot an issue that I had with my main display, which is a Samsung CRG9 49" Ultrawide. I fully expected this modern Mini PC with an 11th gen Intel CPU and Intel Xe graphics to just work normally connecting through the DisplayPort (DP), but after switching out three cables, I was unable to get the display working properly, it kept glitching out.
On HDMI (GEEKOM ship an HDMI cable with the unit) I could only get a maximum of 60Hz at any screen resolution. Believing it to be faulty, after getting a replacement Mini PC through my contact, I was finally able to confirm that my screen only works fully through DP to USB4, which is a relatively new technology and supports DisplayPort 1.4a-based Tunneling. It is the only port which supports 5120 x 1440 @ 120Hz, but for the purpose of this review and screenshots, I have it set to 2560 x1440 @ 120Hz. Thankfully there are two USB4 ports, one on the front and one on the back, for the purpose of cable management.
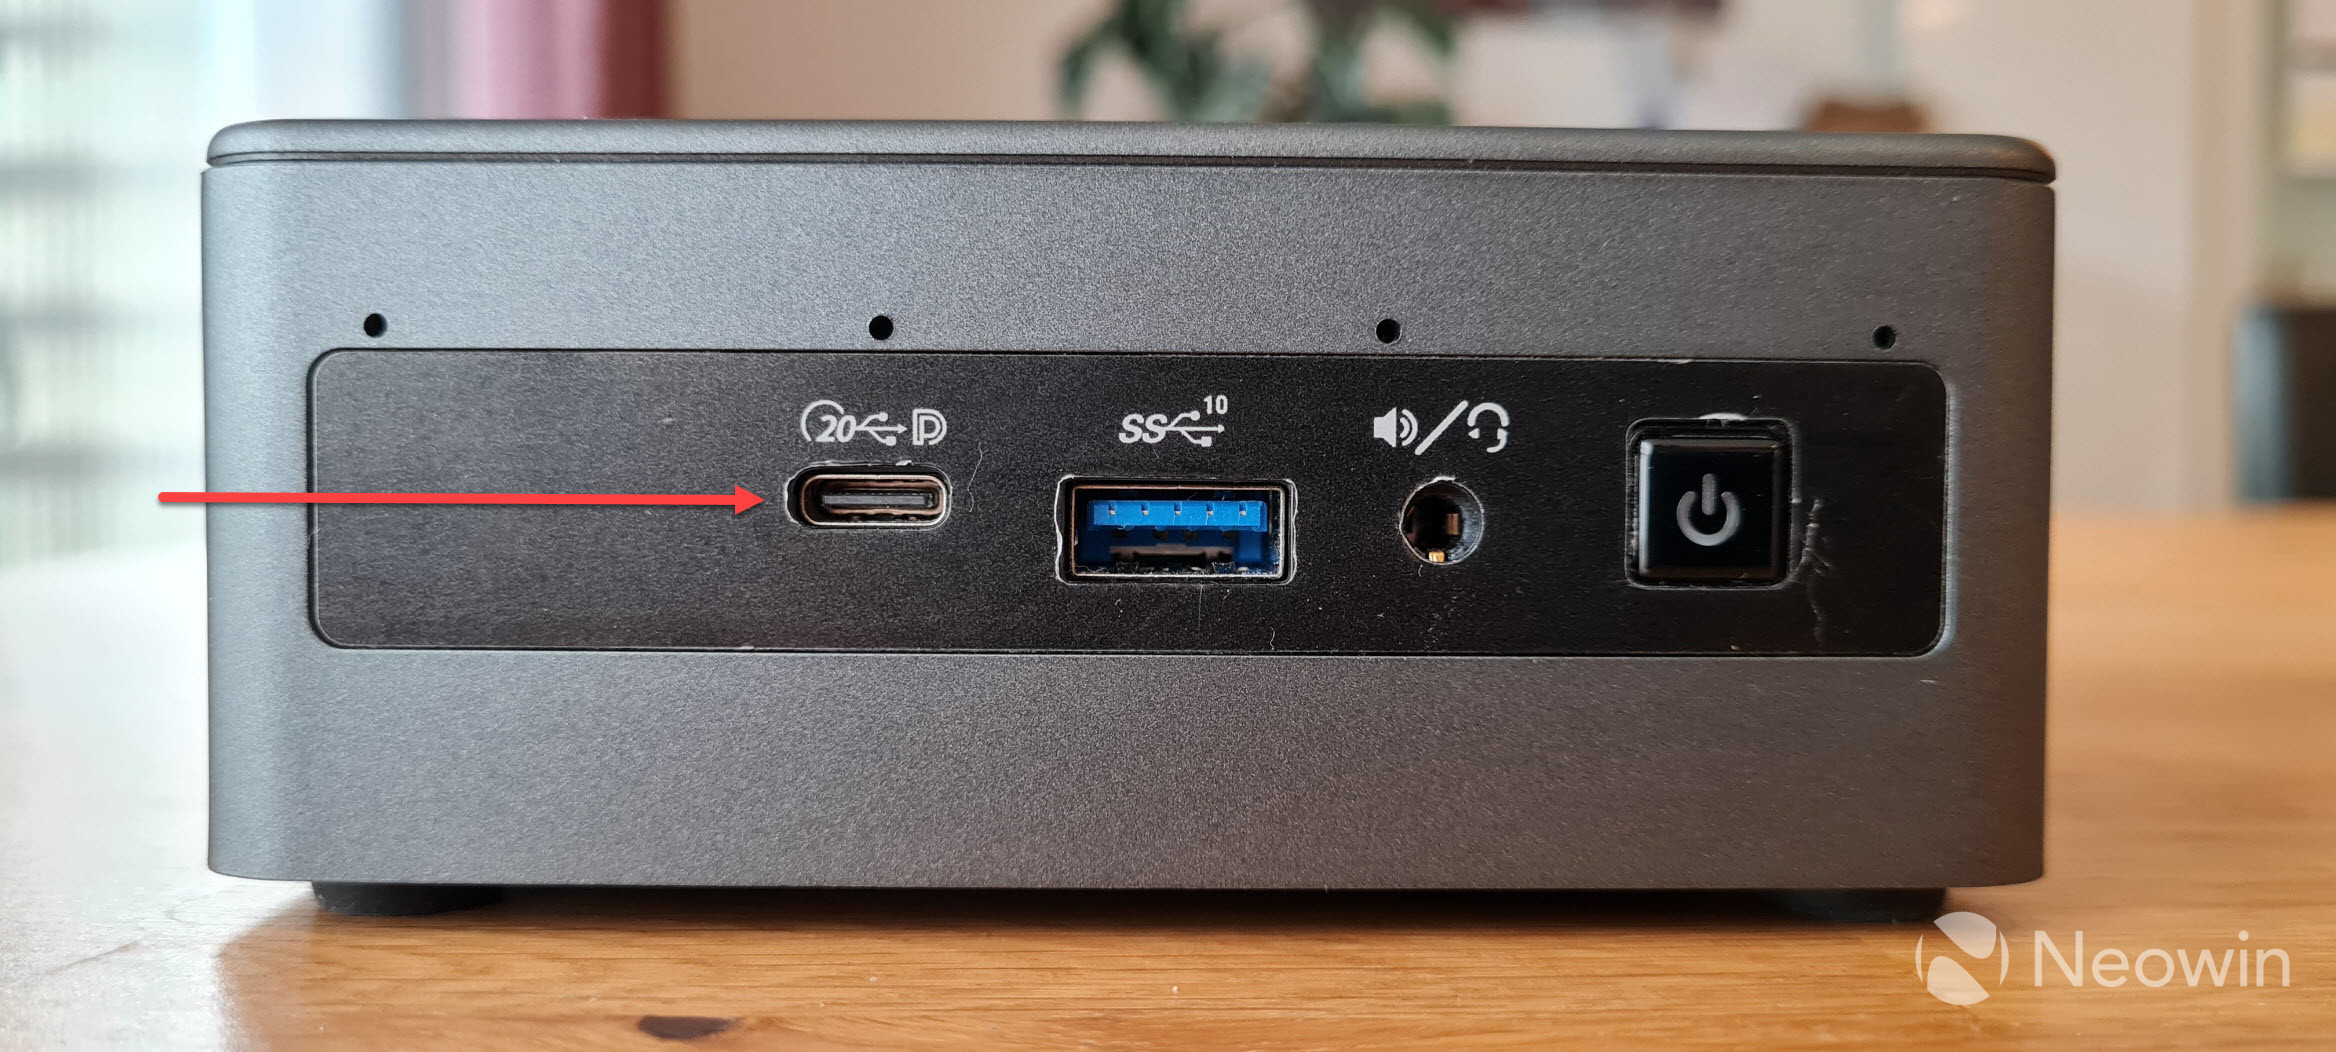
The ports denoted with the red arrow above are what I ended up using with my Ultrawide. It"s unclear why the screen won"t work fully on HDMI or DP, since Intel says on its website that it should support max 4K (HDMI) and 8K (DP) @ 60Hz while my screen is only a max of 2K @ 120Hz.
It"s actually physically possible to attach four screens to the Mini IT11 using the DisplayPort, HDMI and the two USB4 ports if you wanted. Regarding connectivity, there are also two USB 3.2 gen 2 ports and a barrel port for power on the back. Around the front, there"s another USB4 port, a USB 3.2 gen 2 port and a port for a 3.5mm headphone jack.
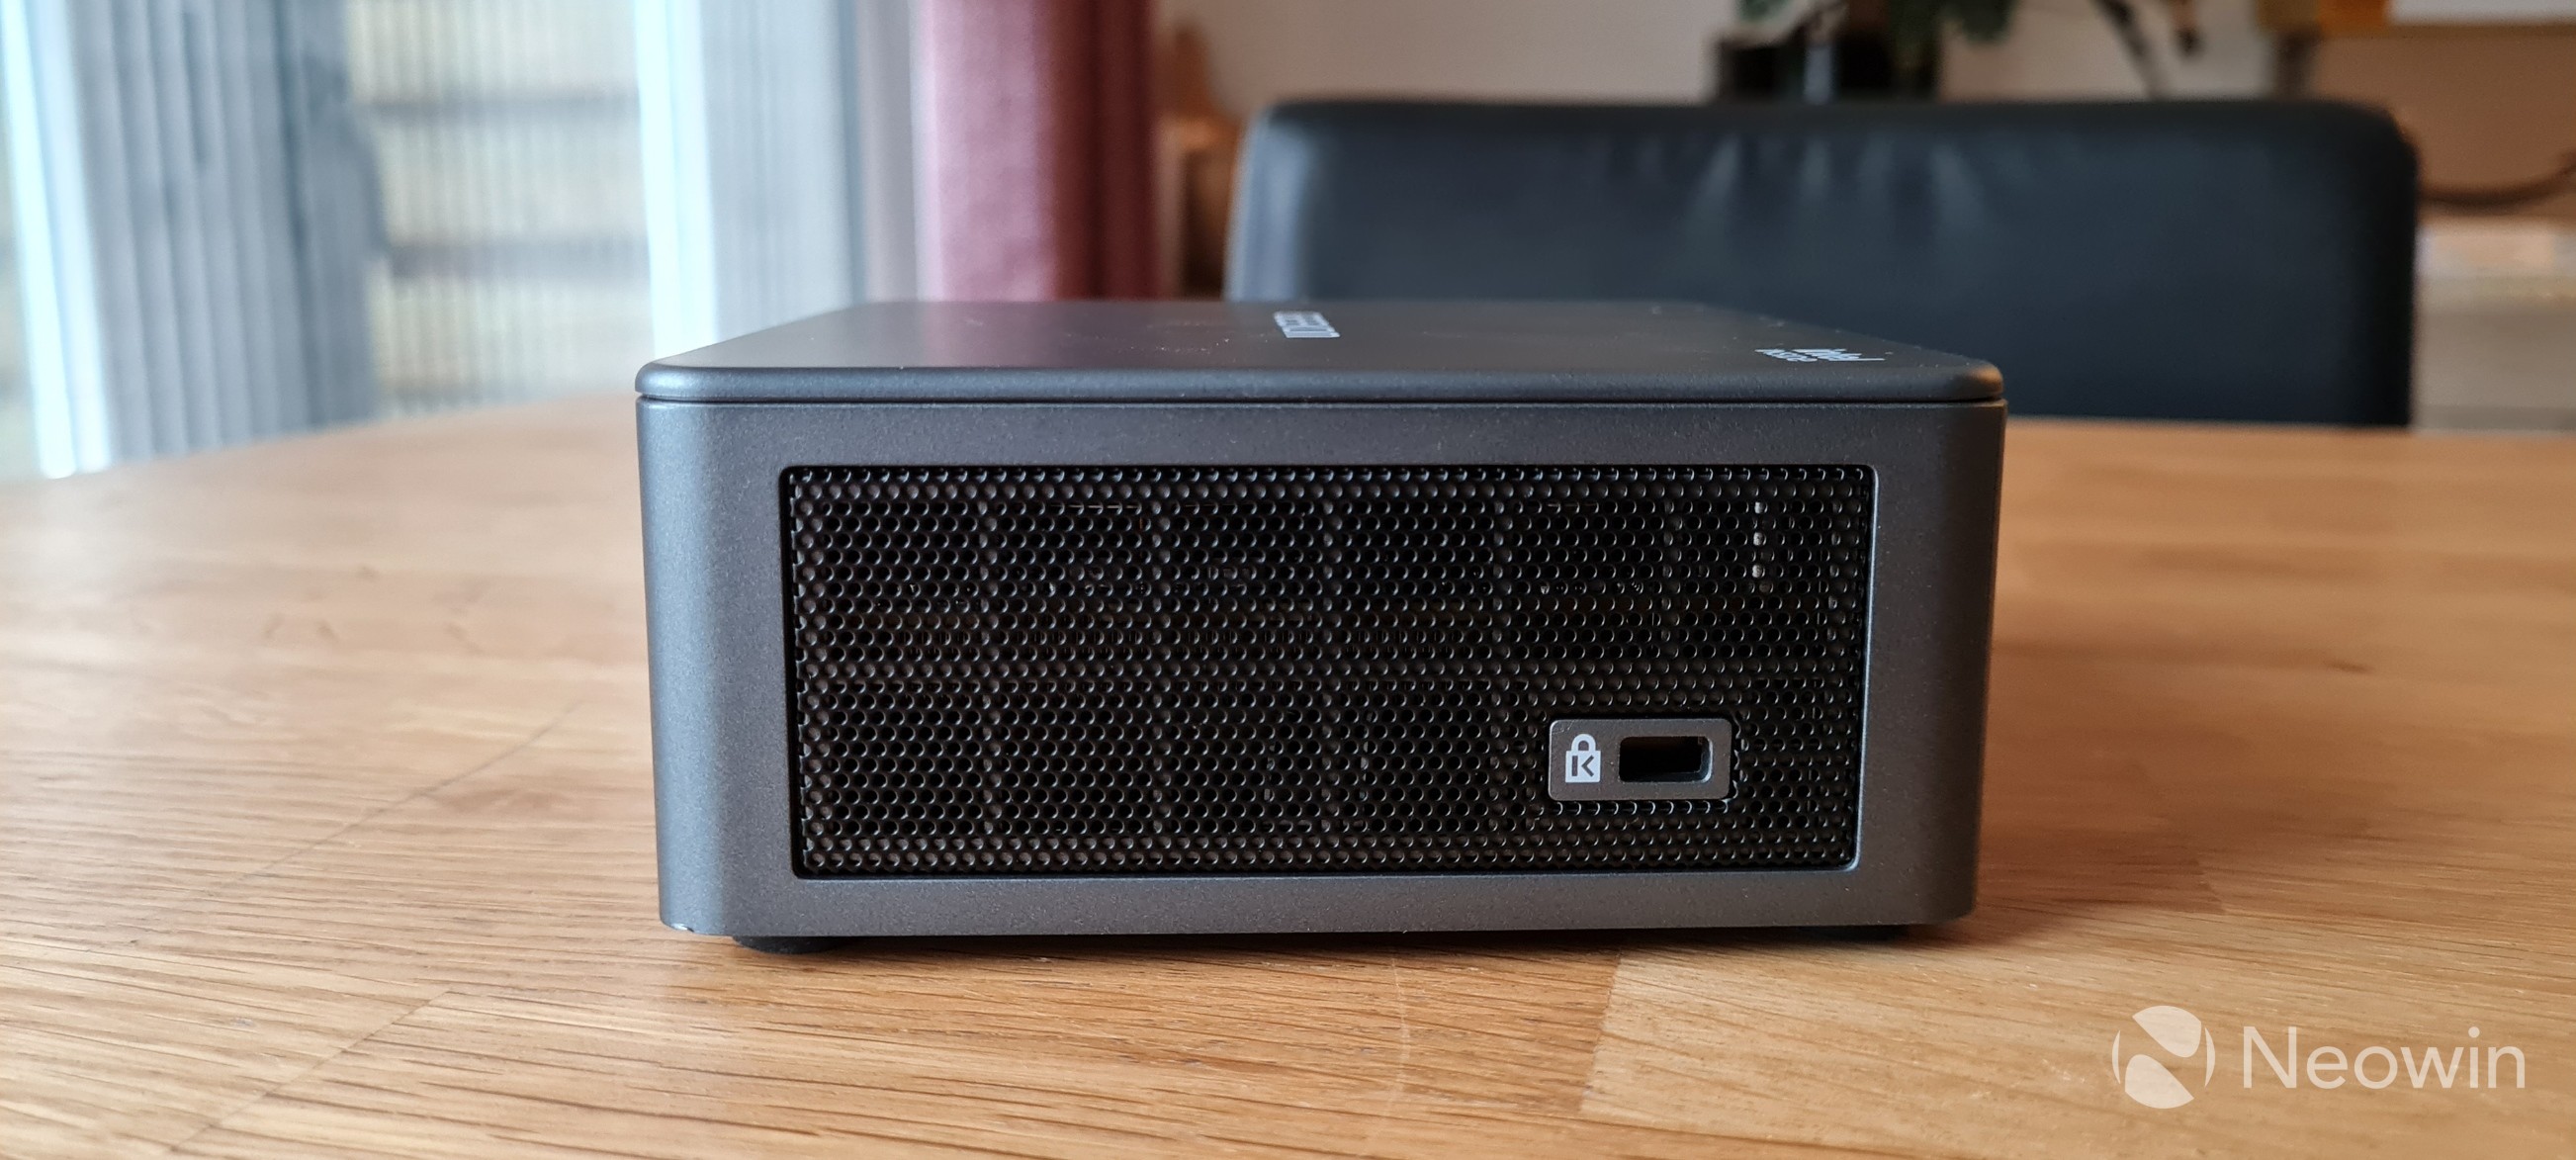
As you can see from the two images above that, you can affix a Kensington lock on one side and insert an SD adapter for a micro SD card on the left side of the Mini IT11.
Benchmarks
With that out of the way, and because people like that sort of thing, I ran some benchmarks and compared it to my main PC which I built in 2019. The Mini IT11 is running Windows 11 Professional 22H2 (Moment 2 update) build 22621.900 and the latest Intel driver is installed which is v31.0.101.3790 (October 2022).
My Main PC consists of the following:
- Intel Core i9-9900K (stock)
- Gigabyte Z390 AORUS PRO WIFI (BIOS revision F12)
- 64GB DDR4-3200 G.Skill Ripjaws (16-18-18-38) dual channel
- Samsung 980 1TB NVMe
- KFA2 RTX 2070 SUPER (Nvidia driver 527.37)
- Windows 10 22H2 build 19045.2311
For the benchmarks, I used 3DMark, PCMark 10, Geekbench, and Cinebench. 3DMark Time Spy tests gaming capability with DX12 graphics performance. PCMark tests are a mix of CPU and real-world productivity tests, such as using an office suite, web browsing, light photo/video editing, and making conference calls. Cinebench stresses the entire CPU as it is a multi-threaded rendering test. Finally, Geekbench is a synthetic benchmark that is great for a quick look at the potential performance across a wide range of workloads.
| GEEKOM Mini IT11 Core i7-1195G7 | Selfbuild Core i9-9990K | |
|---|---|---|
| 3DMark (Time Spy) | 1,635 | 9,995 |
| PCMark 10 Extended test | 5,159 4,810 | 6,619 8,853 |
| Geekbench Single / Multicore Compute (OpenCL) | 1,583 / 4,543 15657 | 1,300 / 8,186 99450 |
| Cinebench Single / Multicore | 1,532 / 4,947 | 1250 / 11,711 |
I also tested the SSD"s capability using AS SSD and CrystalDiskMark.
| AS SSD | CrystalDiskMark |
|---|---|
Despite running all of the above benchmark tests, the Mini IT11 did not get hot to the touch and there were no annoying noises coming from the single fan that cools the unit.
Conclusion
One thing that is clear from using this Mini PC is that it isn"t a gaming PC, you will not be able to enjoy graphically intensive games on it, but it absolutely is suited as an office workstation, or perhaps a good solution for a student with limited living space with the ability to pack this away after every use. This thing isn"t taking up much room, you can even screw it to the back of a screen if it has VESA support with the included mount plate.
In a world that is apparently too stingy for phone manufacturers to include a power lead and charger for their flagship phones, GEEKOM has provided all of the cables and tools necessary to get started straight away, along with a Windows 11 Pro license and a clear guide with instructions on how to access the internals. There"s even a carry bag included.
Assuming you"ve made it this far, yes at $749, the Mini IT11 is a hard sell if we consider that there are plenty of other cheaper (AMD) options available on the market for around $200 less, the BEELINK SER5 is one such example, and which also came out in the summer of 2022. However, considering GEEKOM is already discounting the MSRP by $100 on its own site, and then knocking off an additional $60 until the end of the year, the Intel solution suddenly looks enticing at $589. Plus it becomes clearer what you are paying for when you realize that the AMD option does not include USB4, a Displayport, an SD Card slot, or even a Kensington lock and more.
It also has to be said that the starting price (without promos) is $519 for the Intel Core i5-1135G7 variant, but the rest of the specs remain the same as our test machine. As I said earlier, the decision ultimately comes down to what you"re willing to pay for the options you need. This Mini PC will connect to virtually any display type, whereas cheaper solutions will be limited to HDMI.
GEEKOM also let us know that until December 30th they are running a promotion where you can save $60 off the version I tested, that"s the i7-1195G7 with 16GB RAM and a 512GB NVMe for $589 using code: XMIT11A upon checkout. You can also bag the 1TB NVMe and 32GB variant for $709 using the same code. Both Mini IT11s also ship with a free wireless keyboard and mouse throughout the promotional period.
Our stories may contain affiliate links for products/apps where Neowin is paid an affiliate fee if you complete a purchase via those links.