
Microsoft recently released Windows Subsystem for Android Preview for all Windows 11 users, effectively allowing you to run Android apps on a computer. Unfortunately, it does not provide access to the Google Play Store. Instead, Microsoft partnered with Amazon to give Windows 11 users Android apps through the Amazon App Store.
If you do not want to use the Amazon App Store to download and install Android apps, here is a detailed guide about installing the Google Play Store on Windows 11.
Important: Microsoft does not support the Google Play Store on Windows 11, which means things can go sideways at any moment. Microsoft might push an update to throw a wrench into the thing and disable the Google Play Store on your computer. Keep in mind that you are responsible for your actions, devices, and potential damages.
We have successfully tested this guide before publishing it, but we cannot guarantee the Google Play Store will work on your computer. Also, you may want to consider minimum hardware requirements for Android apps on Windows 11.

Install Google Play Store on Windows 11
We recommend starting with a "clean" installation with no existing instances of Windows Subsystem for Android. If you already have one, uninstall it.
- Press Win + R and enter optionalfeatures. You need this to enable Virtual Machine Platform and Windows Subsystem for Linux. The latter is required to modify the WSA kernel to include Google Services.
- Place checkmarks next to Virtual Machine Platform and Windows Subsystem for Linux.
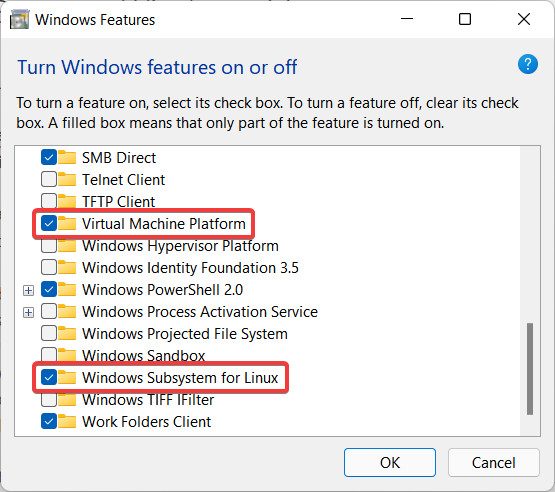
- Click OK and wait for Windows to download the necessary files. Restart your computer once prompted.
- Now it is time to download Windows Subsystem for Android. Open the store.rg-adguard.net page. It allows downloading files from the Microsoft Store.
- Set the first drop-down list to ProductID, then paste 9P3395VX91NR into the search box. Select Slow from the second drop-down, then click the button with a checkmark icon.

- The website will generate a list of available files to download. Scroll down and find the largest files that "weighs" approximately 1.2GB. It has the msixbundle extension in its name.

- Also, download the Microsoft.UI.Xaml.2.6_2.62112.3002.0_x64__8wekyb3d8bbwe.appx file. You may need it in future steps for troubleshooting.

- Open the OpenGapps website. There you will download Google Services for your computer. Select the x86_64 platform, Android 11.0, and the pico variant. Click the big red button to download the archive.

- Next, install Ubuntu from the Microsoft Store.
- Finally, go to a GitHub repository using this link and download the WSAGAScript.

Those are all the files you need to install the Google Play Store on Windows 11. We will now show you how to prepare the files and modify the WSA kernel.
- Find that large msixbundle file you have downloaded from the store.rg-adguard.net website. Open the file in any app for archives. 7Zip is a solid variant you can download from the official website for free.
- You will find lots of msix-files inside the archive. Find the biggest one (approximately 720MB) and open it inside 7Zip.

- Launch File Explorer and navigate to drive C. There, create a new folder and rename it to WindowsSubsystemAndroid.
- Go back to 7Zip with the open msix-file. Extract all files from the file to the WindowsSubsystemAndroid folder.
- Now you need to remove several files and folders. Delete the AppsMetadata directory, AppxBlockMap, AppxSignature, and Content_Types.
- Go to drive C and create another folder. This time, rename it to GAppsWSA.
- Open the WSAGAScript archive and the only folder inside it. Extract all the files from the folder to GAppsWSA.
- Find the archive you have downloaded from the OpenGapps website and copy it to C:\GAppsWSA\#Gapps (assuming your current Windows installation is on drive C).
- Now return to WindowsSubsystemAndroid in drive C and copy the product, system, syste_ext, and vendor files to the C:\GAppsWSA\#IMAGES folder.
All files are now locked and loaded, ready for hacking inside WSL.
- Launch Ubuntu from the Start menu. If this is the first time you are launching Ubuntu, the OS will show an error and ask you to download the Linux kernel update package. You can get it from the official Microsoft documentation using this link.
- Close Ubuntu, launch the downloaded file and proceed with the installation.
- Relaunch Ubuntu. This time, it will ask you to give a new user a name and a password. Note that the OS will not display password characters as you type.
- Now we need to get to the GAppsWSA directory. Type cd /mnt/c/GAppsWSA/ and hit Enter on your keyboard.
- It is now time to execute a bunch of commands inside WSL. Enter apt update and press Enter. Wait for the system to complete the process. Proceed with the following commands one after another, and be sure to press Enter after entering each.
- apt upgrade
- apt install lzip unzip
- apt install dos2unix
- dos2unix ./apply.sh
- dos2unix ./extend_and_mount_images.sh
- dos2unix ./extract_gapps_pico.sh
- dos2unix ./unmount_images.sh
- dos2unix ./VARIABLES.sh
- ./extract_gapps_pico.sh
- ./extend_and_mount_images.sh
- ./apply.sh
- ./unmount_images.sh
Your custom WSA kernel with Google Services is now ready. All that is left is to install Windows Subsystem for Android and make sure the Google Play Store is working correctly on your Windows 11 computer.
- Go to C:\GAppsWSA\#IMAGES and copy the following files: product, system, system_ext, and vendor. Paste those files into C:\WindowsSubsystemAndroid.
- Go to C:\WindowsSubsystemAndroid\Tools and rename the kernel file to kernel_bak.
- Open the C:\GAppsWSA\misc folder and find the kernel_x64_64 file. Copy and paste the file in the C:\WindowsSubsystemAndroid\Tools folder.
- Rename the file to kernel.
- Now it is time to enable Developer Mode on your computer. Open the Settings app and go to Privacy and Security > For Developers. Toggle on the Developer Mode switch, and confirm the action when prompted.

- Final stretch. All that is left is to execute a command to install WSA with the Google Play Store on Windows 11. Right-click the Start menu button and select Windows Terminal (Admin).
- Paste the following command: Add-AppxPackage -Register C:\WindowsSubsystemAndroid\AppxManifest.xml. Press Enter.
- Terminal may show you the following error: Add-AppxPackage : Deployment failed with HRESULT: 0x80073CF3, Package failed updates, dependency or conflict validation. Windows cannot install package. To fix this issue, launch the Microsoft.UI.Xaml.2.6_2.62112.3002.0_x64__8wekyb3d8bbwe.appx file you have downloaded earlier. After that, repeat the previous step.
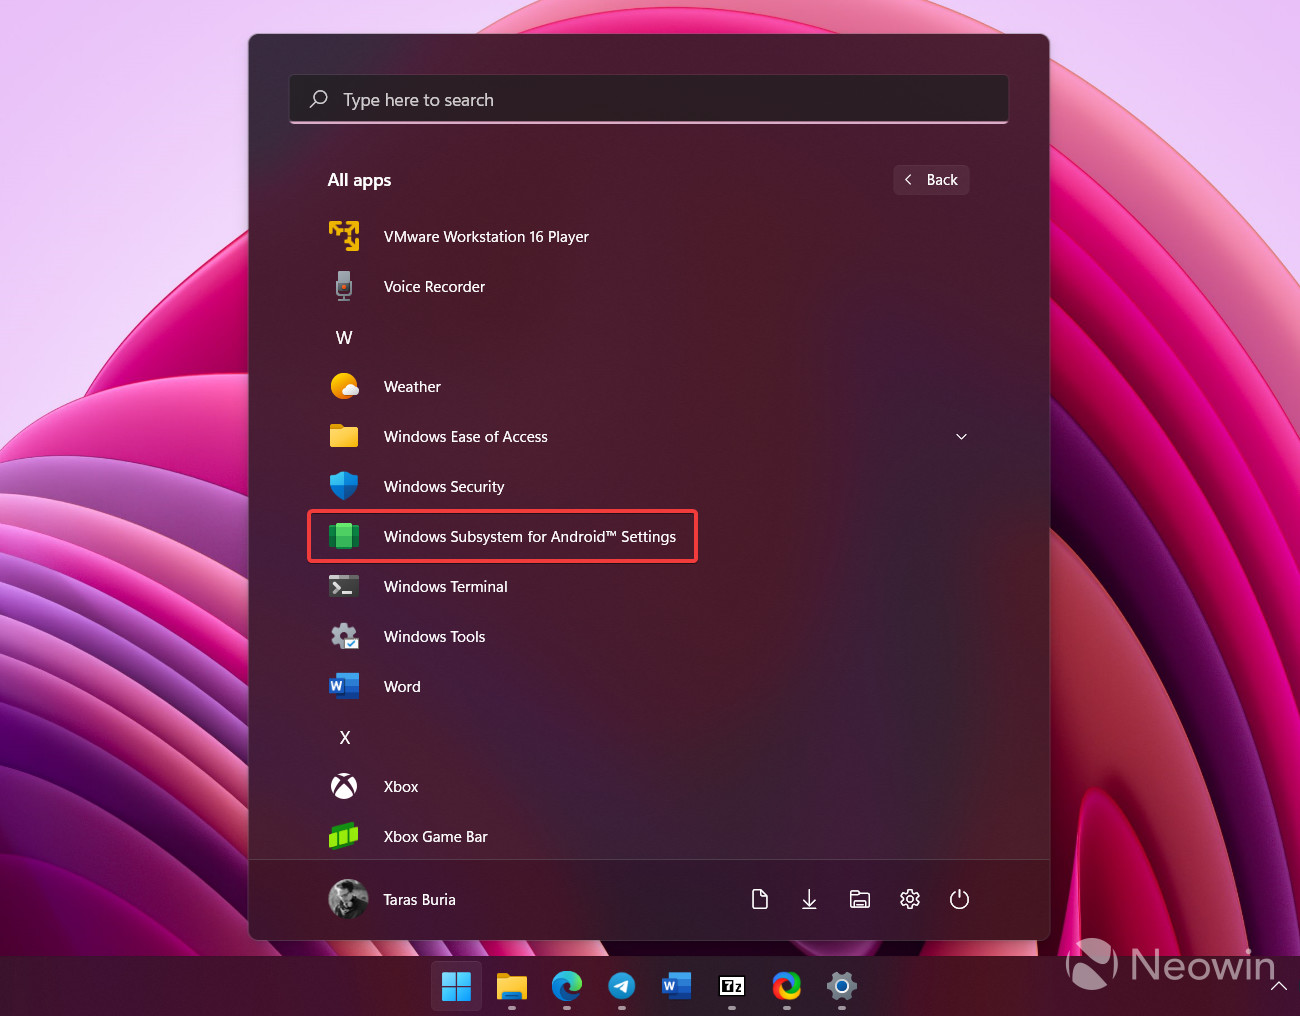
- Windows Subsystem for Android is now ready to go. Open the Start menu and find Windows Subsystem for Android. Launch it.

- Toggle on the Developer Mode switch, then click Files. That will start WSA (do not share diagnostic data with Microsoft), and you will see notifications from Google Services about installing apps with all the needed components.

- In a minute or two, you will see the Google Play Store in the list of all apps. You can launch it, sign in with your Google account, and download all the apps and games you need. Keep in mind that some of them may not work on Windows computers.


All the apps installed from the Google Play Store on Windows 11 will show up as regular programs on your PC in the Start menu. You can uninstall them just as you do with native Windows apps.
That is it. Now you know how to install the Google Play Store on Windows 11.


22 Comments
Load the comments and join the conversation!
Read the comments, ask the editors questions, show respect and join the conversation.