Hi, I'm Adam, I'm known as Warwagon on the forum. For the past 19 years, I've been operating my own computer repair business. In doing so, I deal with the average computer user on a day-to-day basis.
Every bit of information I provide for people I do so with the lowest common denominator in mind. It's a common misconception that everyone who joins or browses a tech site is a techie. Some people are just looking for guidance. That is why for some, these tech tips may seem a bit too simplistic but they are educational for others.

The following tech tip is only available in the 22H2 update of Windows 11. It’s called “Live Captions”.
It’s an accessibility feature which allows you to have a box on your computer screen providing close captioning all audio on your computer. It will give you captions for every video you watch and every audio call you have. If it's a spoken word, it will caption it.
You’ll first want to see if you have Windows 11 and the latest version of it:
- Click start and type in “winver” and press enter.
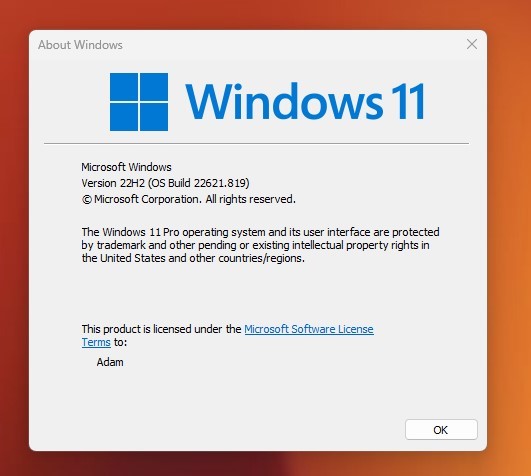
If it says, “Windows 7, 8 or 10” ... sorry..

If it says “Windows 11” look at the version number, if it says “22H2” …GREAT! You’re all set. If it says “22H1” then you still need to update.
To check for the latest update:
- Clicking “Start”.
- Type “Windows update”
- Clicking “Check for update”
- Then click the big blue “Check for updates” button
If 22H2 is available for you you’ll see “Windows 11 22H2” listed below with an option to install it.
My dad has hearing aids and uses close captioning for most things he watches. It has always been hard to watch videos on the internet when close captioning isn’t available. With “Live Captions”, it’s available everywhere.
- To enable this feature click “Start”
- Type “Live Captions”. and press enter. You can also access it with a keyboard shortcut by holding down CTRL+WIN and pressing L just once (CTRL+WIN+L).

Now just follow the setup process.
Once it’s setup, you’ll see it located at the top of your computer screen. You can click the gear on the top-right, select “Position”, and find the spot which works best for you.

Now, click that same gear, select “Captioning style,” and on the next screen that appears, click “Edit”. Here you can configure the color of the box and even the font (not a lot of choices) which is used.

Happy Computing!
Wait, there's just one more thing!
Here is a video on how to setup Live Captions and a demonstration of how it works.
If you learned something today, great! If not, maybe share your own tech tip in the comments below!


1 Comment
Load the comments and join the conversation!
Read the comments, ask the editors questions, show respect and join the conversation.