
Earlier this week, we shared a guide on how to create recovery media for your Windows 10 PC. That guide went over the process of backing up your device drivers and creating a recovery flash drive you can use to install Windows, which are the essential aspects to have a functional machine after the process.
This time, we're going to share how to go through the actual recovery process, including backing up your personal files so you can get them back after you reinstall Windows. We'll be focusing on a completely clean installation of Windows, but the process should be similar if you're using an OEM-specific recovery drive.
Backing up your data
The first thing you'll want to do is back up your data so you don't lose any of your files in the process of restoring your system. There's no shortage of ways you can go about it depending on your usage preferences. If you only have a handful of files you need to keep, you can copy them manually to a flash drive or upload them to the cloud. However, there are a couple of solutions built into Windows you can use if you'd like to.
Option 1 - Backup with OneDrive
If you use OneDrive, you can set up a backup on OneDrive, which includes your Desktop, Documents, and Pictures folders. To set this up, you can open the Settings app, then choose Windows & Security. From here, open the Backup section. Here, choose Back up files under Back up files to OneDrive. A window will pop up so you can choose which folders to back up.

Of course, there are some things to keep in mind with this option. Only these three folders can be backed up, and even then, you need to have enough storage left on OneDrive and a fast internet connection for the backup process to go over smoothly and relatively fast.
Option 2 - Backup to an external drive
If you'd rather do it locally, there's another option, which is File History. This option is a bit more comprehensive, and it works locally, which might be a better option. Just like with the OneDrive option, you can access File History by opening the Settings app, heading into Update & Security, then Backup.
In this case, we're interested in the second section, Back up using File History. At this point, you'll need to have an external drive plugged in, such as a flash drive or external HDD or SSD, and make sure it has enough space to store everything you want to back up. Click Add drive and select the device you want to use to back up your data.
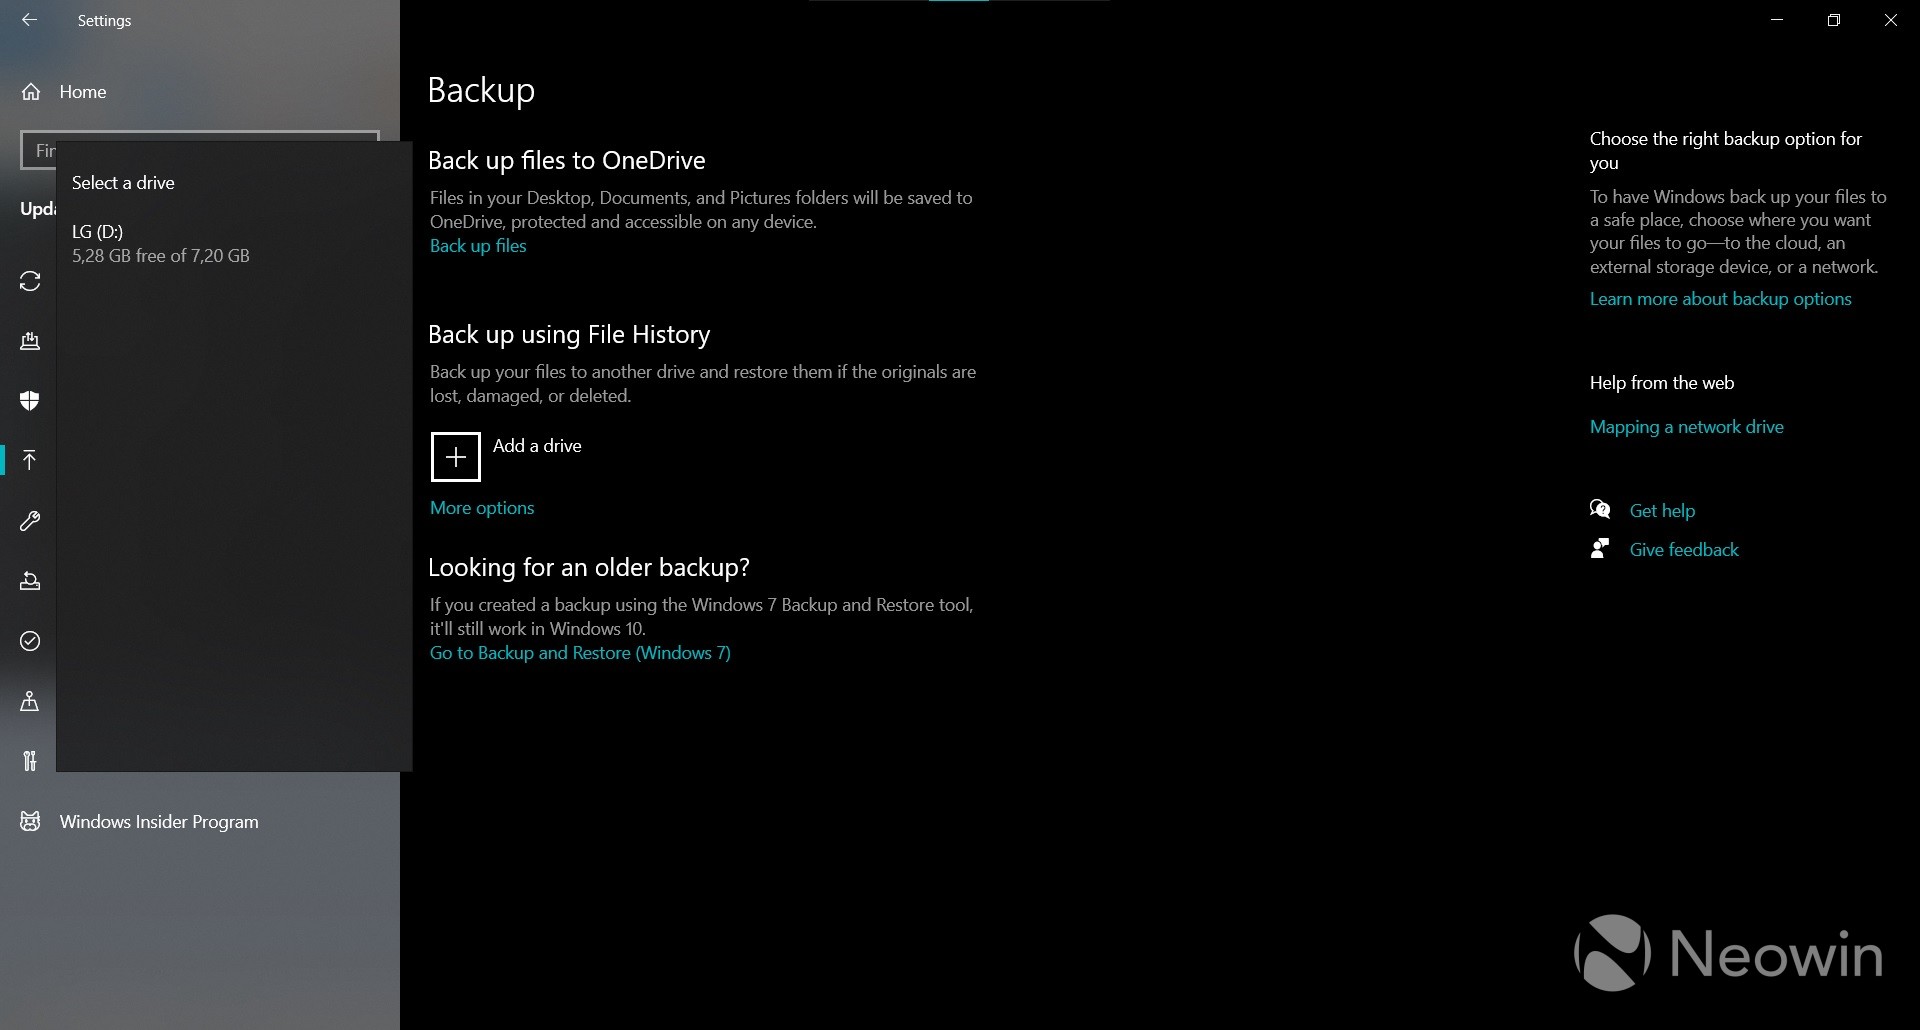
Once you select the drive you want, an automatic backup will be enabled with some default folders. Click More options to check the backup settings. You can add or remove folders from the backup, or exclude certain folders from being backed up if, for example, you want to backup everything inside a folder excluding a specific sub-folder. You can set up regularly scheduled backups if you want to keep your data safe at all times, but if you're just preparing for a clean install, you can click Back up now to back up your data as is. You do need to make sure the drive has enough space for the backup, which will vary based on what you're backing up.

Once the backup is done, you may want to cancel future backups so Windows doesn't try to repeat it inadvertently. You do this by clicking the Stop using drive button at the bottom of the page, which won't delete your existing backup. Of course, you can always keep it if you want regular backups to be done.
Using recovery media to install Windows
Once you've created recovery media for your PC using any of the methods in our guide, all that's left to do is use it to start the recovery process. This will delete the data on your PC, so make sure to backup up your data first. To boot from the flash drive you want to use as recovery media, the easiest method is the Advanced startup menu in Windows 10. Open the Settings app, choose Update & Security, then Recovery. Here, click Restart now under Advanced Startup.

When the computer restarts, you'll be presented with a very blue screen with some boot options. You'll want to choose Use a device, then find the drive you used as a recovery drive. The computer will restart again and begin the recovery process.
On older computers, you may need to press a certain key, such as F12 or Esc, to open the boot options menu while the computer is booting up. You'll also need to do this if your computer can't boot into Windows. Each brand uses a different key to access this menu, and some have changed over time, so if F12 or Esc don't work for you, try to find out what specific key your computer uses.
Option 1 - Using a clean installation of Windows
After booting into the installation media, you may see a warning about whether you want to upgrade or do a clean install. Click No to go forward with the clean install and follow the on-screen instructions to choose your language and regional configurations and then choose Custom: Install Windows only (advanced). You'll then see a list of local drives on your PC.

You can choose to format each of the available partitions or drives, or you can delete all the partitions and create a new one for the installation. You'll have to select a drive labeled as Primary as the install location, then click Next and wait for the process to finish. You'll then be taken to the Windows out-of-the-box experience (OOBE) to set up your computer.
Option 2 - Using a Windows recovery drive
If you created a recovery drive using option 3 from our previous guide, the process is a bit more straightforward. Once you boot into the recovery drive you'll get the option to choose your region and keyboard layout, and then you'll see a similar menu to the boot options menu from before. This time, you'll have an extra option, Recover from a drive, which is what we want to choose here.

After this, simply choose whether you want to simply delete the files or fully clean the drive, and confirm to begin the recovery process. Once it's done, you'll go through the usual setup process for Windows 10, just as with the method above. Finish it up and you should be taken to your desktop environment.
If you used OEM-specific solutions, accessing the recovery drive should be similar, but the process itself will vary. Follow the instructions from the OEM to complete the recovery and you should be ready to go.
Recovering your data and drivers
Once you've set up Windows 10, you may want to get your drivers back, specifically if you used a plain Windows 10 installation drive. If you used our guide to back up your drivers, you can plug in the drive where you saved them and open the Device Manager. To do this, right-click the Start menu icon or press the Windows key + X, then choose Device Manager.
If any drivers are missing, you'll see a warning sign next to the affected device(s). Double-click the device name to open its Properties, then switch to the Driver tab and click Update Driver. Choose the Browse my computer for drivers option, then find and select the root folder containing all your backed up drivers. Make sure to check the box that says Include subfolders, and Windows will find the right driver for each device.

Repeat this for any drivers that may be missing, and you should be ready to go.
As for your personal files, again, there's plenty of options to copy them back to your PC. If you used the OneDrive method (option 1 above) to back them up, simply enabling OneDrive sync again will make the backed up files show up in the proper folder, so you can just choose to save them offline to access them at any time.
If you used the File History feature (option 2), plug in the drive you used for the backup, head back into the Settings app, choose Update & Security, then Backup. Click More options under Back up using File History and then Restore files from a current backup. Choose the latest backup and your files should be restored to their respective folders.
And that's it! If you followed all the steps in both of our guides, you should now have a fully functioning computer again, and everything should be in its rightful place.
Have you tried to recover a Windows PC before? Did you find this guide useful? Let us know how it went in the comments below!


14 Comments - Add comment