It's no secret that I'm a big fan of personal hosting solutions. With data breaches occurring at an ever-increasing rate, having control of your own data is the best solution, and doubly so if you only need to access it from your own home. That's why I love on-site NAS solutions from companies like Synology, QNAP, and Thecus. While these devices are great at storage and offer excellent performance, many of them also offer a great ecosystem of apps that can be installed and managed, extending functionality well past simple storage. Today I'll take a look at Synology's Surveillance Station, a tool that lets you merge multiple IP cameras into a single interface.
Surveillance Station has been around for a while, but Synology has recently upgraded it to version 8.0. Arguably one of the best new "features" of the upgraded version is that there is now a dedicated desktop application that you can install instead of having to use the system through a web browser. While using a browser is great in a lot of situations, being able to have a custom made tool for the job can frequently be a better solution.
So let's take a look at whether Surveillance Station is a product that can meet your needs.
Installation
For the review, Synology lent me the DS416j and two Amcrest IP2M-841B cameras. The flexibility of Surveillance Station lets you use practically any Synology NAS and hundreds of different IP-based cameras, so you aren't tied to this combination at all. In fact, the company has a calculator that helps you decide which NAS device will work best for your situation, depending on how many video streams you'll be recording, how many days of recording you need, and some other factors.
Unlike other reviews, I'm not going to go into the performance of the DS416j right now, although if there's interest I might do a full NAS review in the future.
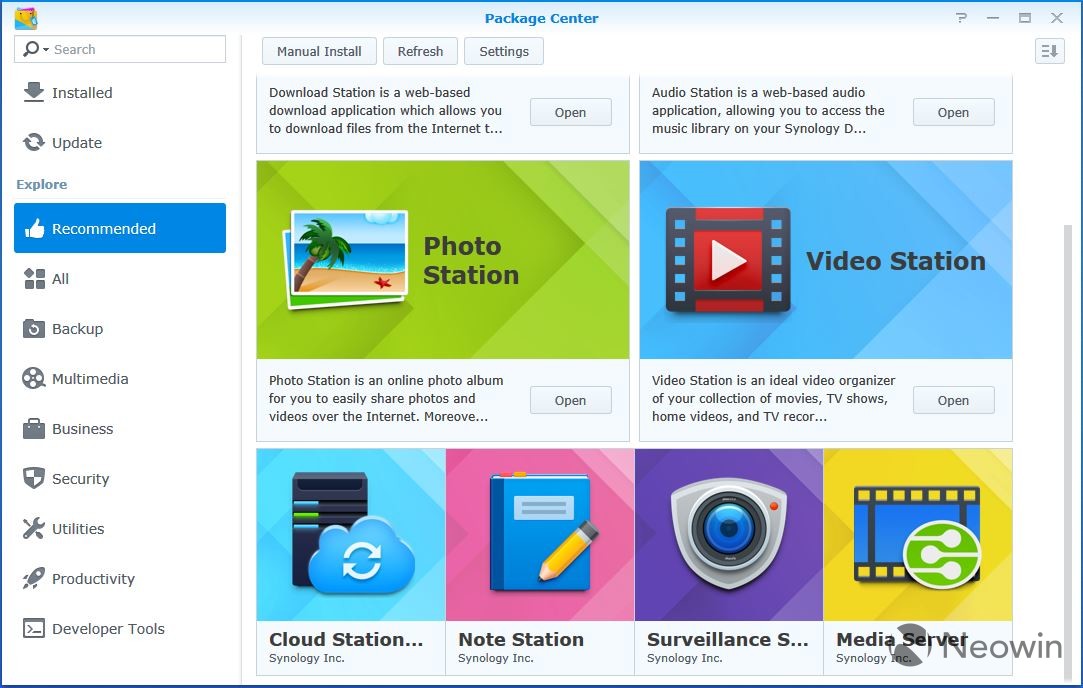
In order to get started, you have to install Surveillance Station on your Synology NAS device. Just like any other package, DSM makes this process simple. Login to the NAS, go to the Package Center, and you'll find it under the list of "Recommended" packages. A single click of "Install" and you'll run be up and running. It's also listed under "Security."

After Surveillance Station is up and running, there are two ways to access it: via the DSM application itself, or via a desktop application. While the former is easier, I found there were many issues that I was unable to resolve, the most important of which is the fact that I was unable to actually play video, regardless of whether I was using Edge, Firefox, or Chrome. Therefore I'd highly recommend sticking to the desktop application.
This is one area where Synology could make things a little clearer for the end user. Aside from downloading the Synology Assistant, I've rarely had a reason to go to the company's support site to download anything else. Unfortunately, after installing Surveillance Station, there's no indication that a desktop client even exists. Considering the fact that the program is completely new and the web version doesn't really work well, I'd think this should be more prominently explained to the user.
There are versions of the client available for both Windows and Mac (sorry Linux users), and the installation is a basic wizard that's easy to get through. Once it's complete, you're presented with three icons: Surveillance Station Client, Live View, and Timeline.

The main client gives you a desktop that has a similar look and feel to DSM, but includes a different set of functionality from the core OS. The other two icons just let you jump directly to a feature without needing the Surveillance Station desktop, useful if you want to put the Live View on a separate monitor by itself, for example.
Configuration
Now that you have the software installed, you can move onto installing your IP camera and configuring the Surveillance Station to work as you want it to, all of which is just as easy as installing the package itself. Initial setup of the IP camera will depend upon the make and model you're using, but once it's configured, adding it into Surveillance Station is simple and easy to do and then you'll never have to use the interfaces of the various camera vendors.

The first step is to go into Surveillance Station. Either the desktop app or the web version will work, but for the rest of the review just assume I'm using the desktop version. Simply go into the IP Camera tool and under 'Add', click 'Add Camera', which takes you into a simple wizard.

The first page is where you name the camera, provide the IP address, and tell the application what make, model, and firmware version the camera is running. One minor bug is that when you're being asked for the firmware version, the dropdown box truncates the version. I was able to determine the correct selection based on the data provided, but this could potentially be an issue depending on how long the version information is. In addition, I didn't actually see a difference in performance regardless of which firmware version I selected.

The next page is where you configure the camera's video and audio (if applicable) formats, as well as the resolution. One of the nice features is that you're able to setup two different profiles, one that's high quality and one that's lower quality. You can use then use these two settings to change the behavior depending on what's happening. For example, in order to save disk space you might normally record at 640x480 and only 5fps, but when the camera detects motion you can bump the resolution up to 1080p at 30fps for a while.

The next page is where you set up the recording features such as how long each video clip will be and how long you'll keep the video. The settings are self-explanatory, and if you want to dedicate an entire NAS device, you can store a lot of data for a long period of time.

Last, you will configure the recording schedule. You're presented with a graph that represents all seven days of the week and all 24 hours of a day. By default, the camera records everything continuously, but in order to save space you have the option of tweaking this. For example, you can select certain timeframes where it only records when there's motion detected. Alternatively, you can leave recording off unless there's audio in the room, passive infrared (PIR) detected, or if the camera is being tampered with although it's important to note that the latter requires the camera to support the feature as well.
Selecting the schedule is done by simply clicking and dragging across the days and times to which you want the selected profile to apply.
Features
The new Surveillance Station desktop client has a lot of features, especially considering it's a free tool with your Synology NAS device. When you first load the desktop application, you'll be greeted with five icons: Live View, Timeline, IP Camera, Recording, and Help.

Live View does just what it says: provides you a real-time view of what's happening on all of your cameras at that point in time. You can click on one of the views and control the camera with the directional pad in the upper-left hand corner of the screen, giving you the ability to look around the room in real time.

You're able to configure Live View to display your video feeds in any manner you want, from having 64 tiny screens to having two large ones.
As noted earlier, the IP Camera tool is used when you want to initially set up a camera or make any changes in the future. The same features you set up initially can be modified again.
The Timeline tool is where a lot of cool features live, and is what you'll use if you suspect something has happened in your building and want to see what it was. As with the Live View, you can set up how the video feeds will be displayed on your screen. You're presented with a calendar in the upper-left hand corner, and by selecting a date, the system brings up the feeds that were recorded on that day.

The two bars to the left of the video show when motion was detected on the cameras. The bar on the left shows all motion across every camera in your system, while the bar on the right shows motion on the currently selected camera. This is a great way to quickly see what was going on in your environment with only a few clicks of a mouse. You can drag the bar on the timeline up or down to view the video at that point in time, or click play to watch it in action.

Since there's a lot of video to go through manually, Synology added a feature called "Smart Search" to utilize the power of the NAS device and make things easier. With Smart Search, you can configure the tool to look for specific things, such as motion, missing objects, foreign objects, lost focus, and more. You then draw on the screen so the system knows where to look in each frame and click the play button to begin scanning. Every time something is detected, a small clip is saved on the right hand side for your review.

The Recordings tool is pretty basic: It contains a list of all of the videos that your system has recorded. It first separates them based on date, and then further scales it down into two 12-hour windows. You can do the same thing by logging into DSM, but this is a nicer view.
Finally, if some of the features don't make sense, Synology includes a comprehensive Help function that provides step-by-step instructions for all of the services provided within Surveillance Station.
Mobile App
While the desktop application has a lot of great features, the mobile app, called "DS cam" is lacking all but the most basic functionality.

The most common use of the mobile app is to conduct live-viewing of the cameras. Load the app, click on the camera you're interested in, and you'll have full control of the camera including panning/tilting and talking through the speaker if the camera supports it, as shown in the center panel of the picture. It works well enough, although there is a slight delay between pushing a button and seeing the results on the screen, even when on the same subnet.
The other feature that will get the most use is viewing recordings as shown on the right panel of the above picture. You're able to select the date and time of the file you want to view, select the file, and view the video. You can even send the video to a Chromecast device if you want.
Aside from that, there's not much the app can do. You can't use the Timeline view, you can't add or configure cameras, and the settings page simply adds a few configuration options for the mobile app itself.
Licensing
By default, every Synology NAS device you purchase allows you to link up two different cameras to the device for free. For a small home setup, that might be ok, but if you need to add more cameras to the system, you need to purchase licenses and they run roughly $50 per extra camera. However there are some more advanced cameras that require extra licenses.
Conclusion
The number of features that Synology packs into Surveillance Station is quite impressive, considering the application is completely free to users. In addition to what I've discussed in this review, there are other features that we didn't touch on. For example, you can add an Axis Door Controller that allows you to control doors from within Surveillance Station, allowing you to see who's at the front door and buzz them in if they're allowed to enter, a feature that's probably not that useful for a home user but could be great for a small business.
If you're looking for a relatively inexpensive way to monitor your home or business, then buying a low end Synology NAS device and a few IP cameras is a great way to get a lot of advanced features to help keep your building secure. If you already have a Synology NAS device and a camera or two, spend some time playing around with Surveillance Station to see if it helps meet your needs.


6 Comments - Add comment