While it's convenient to let someone else manage the storage of your data, that convenience carries a certain amount of risk. You're trusting someone else to secure your personal information, and this isn't always the safest course of action. Although you can't keep all of your personal information out of the hands of bad guys, many people would prefer to keep their private photos, videos, and documents within their own home as opposed to trusting a third party to provide proper security controls.
To that end, today I'll take a look at the Synology DS1019+, a five-bay NAS device that has strong video capabilities.
Specifications
The DS1019+ is part of Synology's "plus" line, meaning it's built for power. As such, it includes an Intel Celeron J3455 quad-core CPU running at 1.5 GHz with bursts to 2.3 GHz and includes both AES-NI to improve encryption performance and the HD500 video chip to allow dual-channel H.264/265 4K video transcoding on the fly. The system runs the latest version of DiskStation Manager (DSM), currently 6.2 update 4, and retails for $649.99.

The model I was sent came with 8GB of RAM, although the base model comes with only 4GB.

There are five drive bays on the DS1019+, providing capacity up to 60TB in a JBOD setup. Most people will configure the box with either RAID-5/SHR or RAID-6/SHR2, which utilizes either one or two disks for redundancy, leaving you with between 36-48TB of storage.
|
CPU |
Intel Celeron J3455, 64-bit, 1.5Ghz with AES-NI encryption |
| Memory | 4GB - 8GB DDR3L-1866 RAM, depending on configuration |
| Disk Capacity | 60TB (12TB x 5) native; 180TB with expansion units |
| Network | 2xGbE (with link aggregation/failover) |
| USB Ports | 1xUSB3 (back), 1xUSB3 (front) |
| Size (H/W/D) | (6.5in x 9.1in x 8.8in) / (166 mm x 230 mm x 223 mm) |
| Weight |
5.6 lbs / 2.54kg |
From a connectivity perspective, there are two Gigabit Ethernet ports on the back that can be aggregated into one to improve performance. Note that you can't double your throughput from a single stream, but rather the aggregation can be used as either failover in case a switch port dies, or can be used to improve bandwidth on multiple streams.
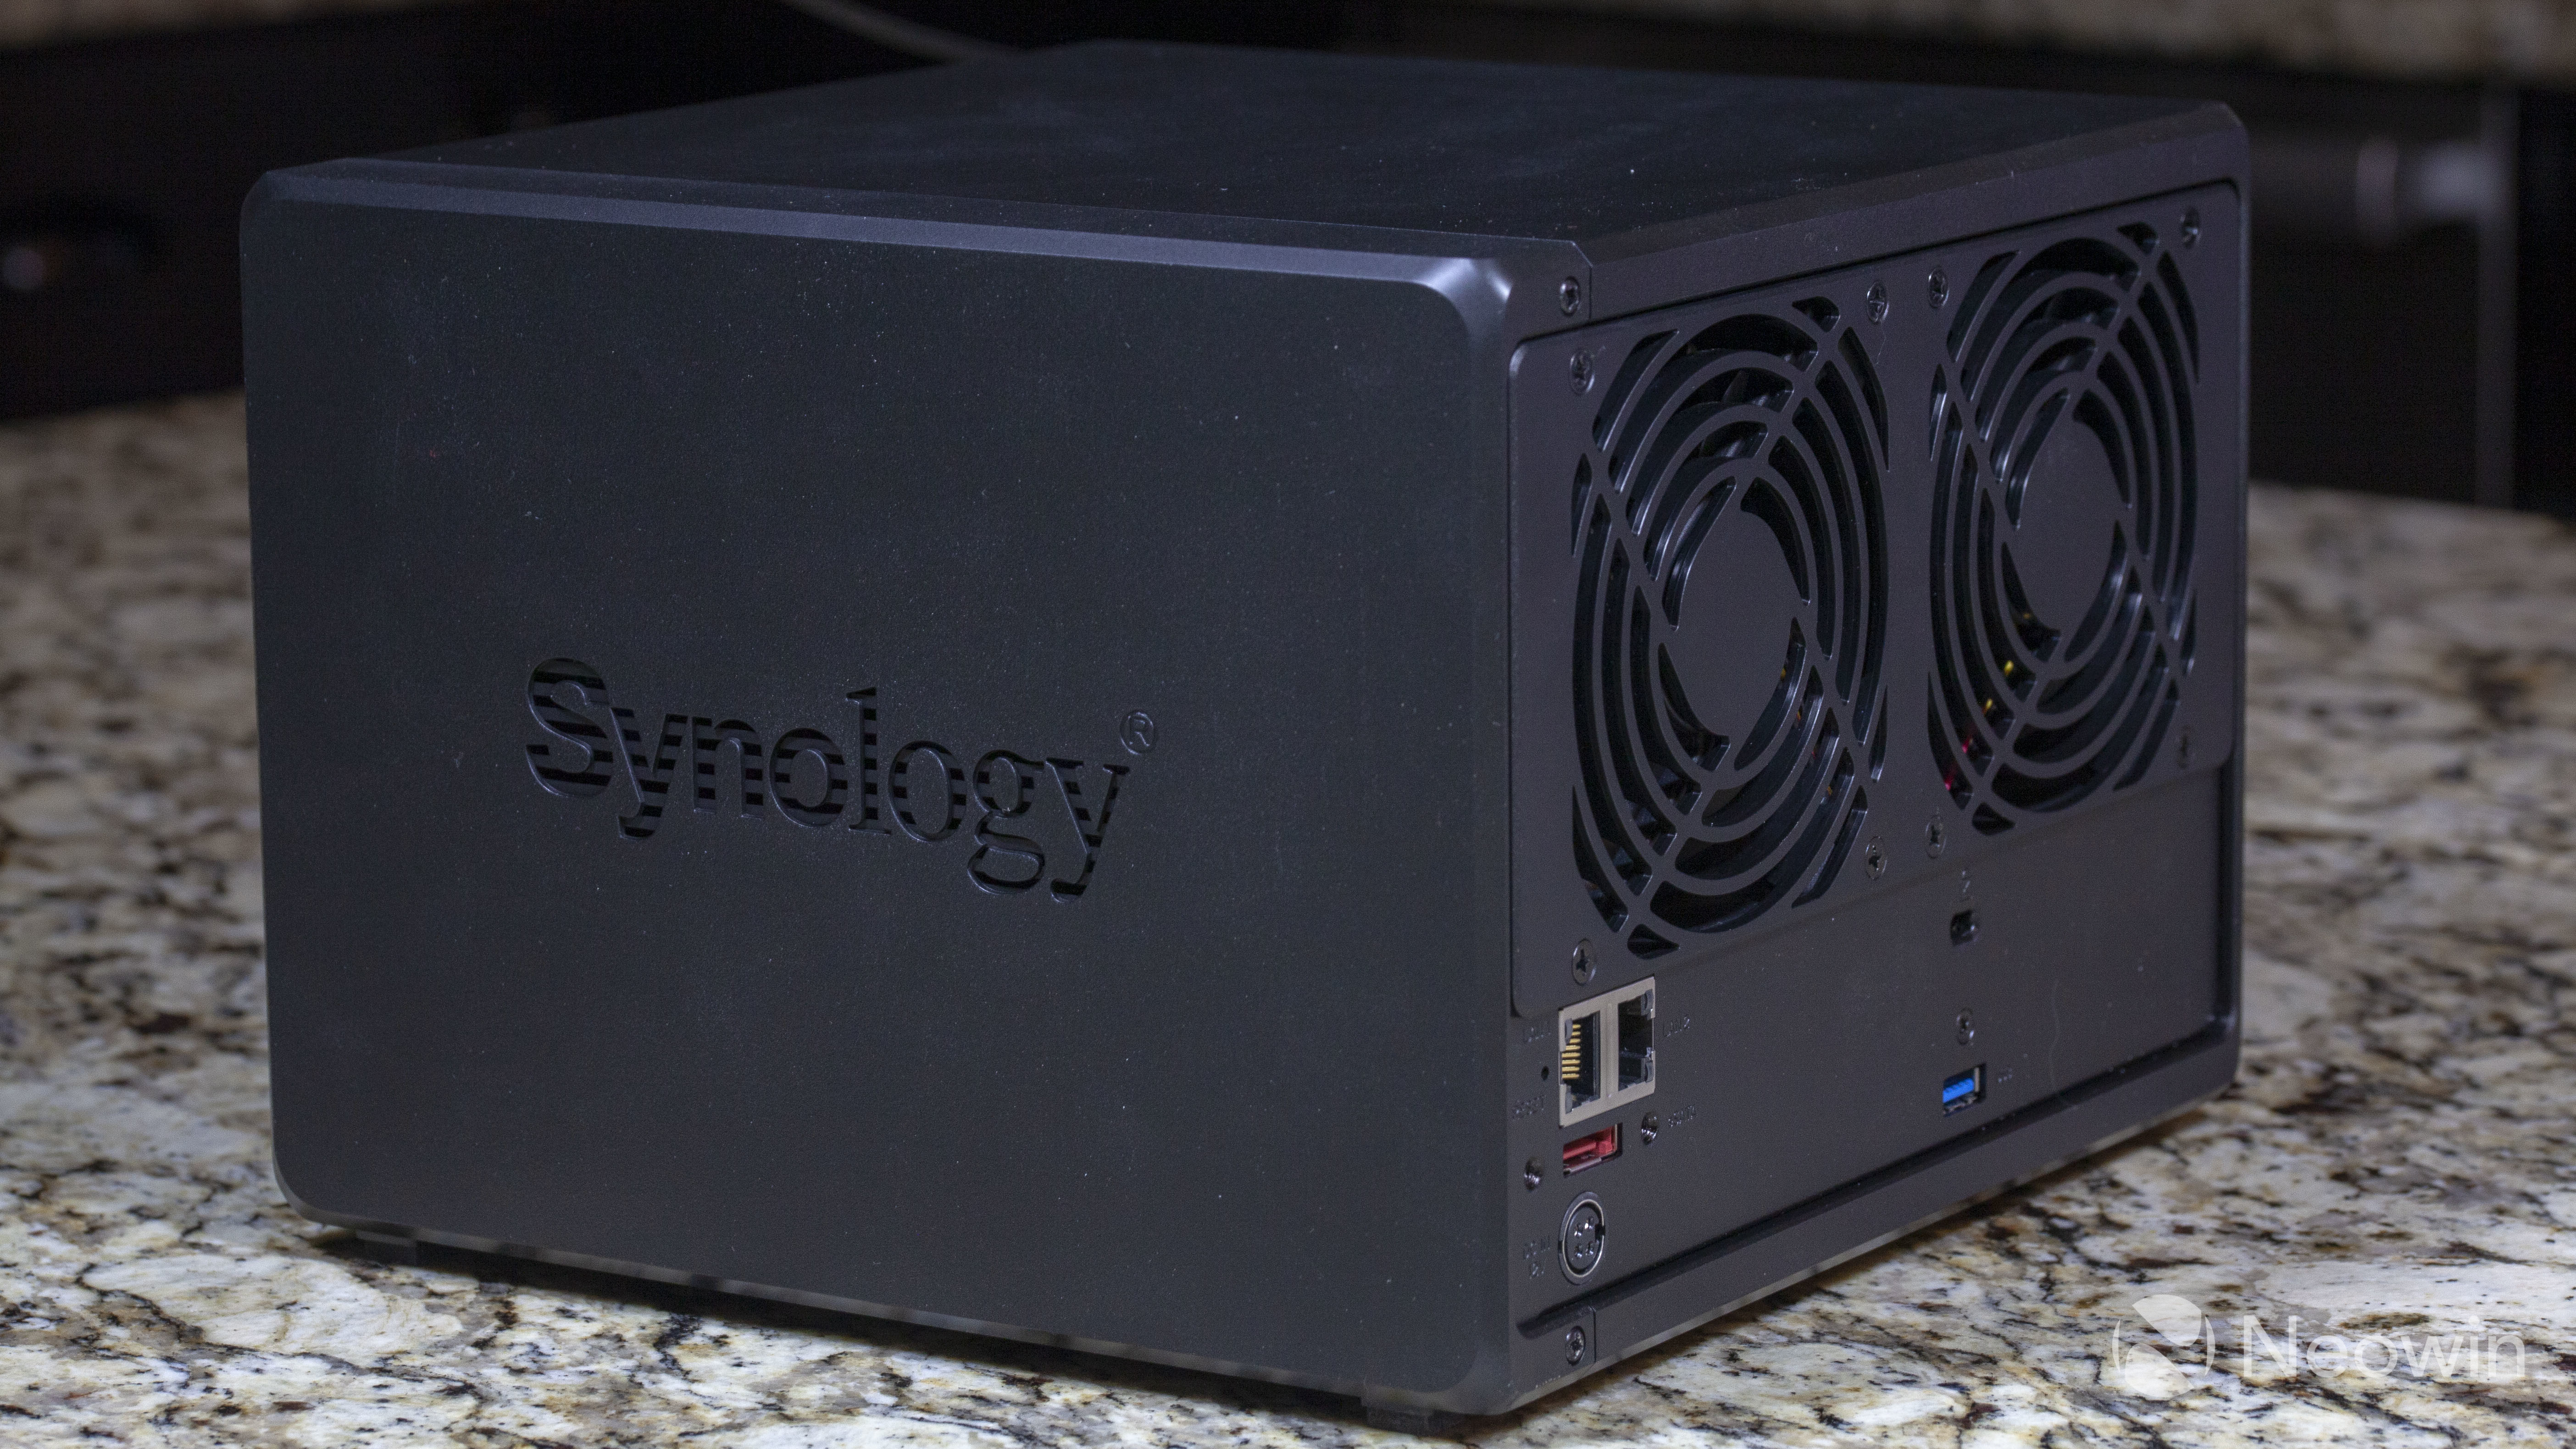
The DS1019+ has two USB 3.0 ports, one on the front and one on the back, although the "copy to NAS" button has been removed from recent Synology models.
In case you want more than five drives for your NAS, there's an eSATA port that allows you to add storage space via a Synology expansion unit. You can also secure the DS1019+ wtih a Kensington lock if you're concerned about the physical security of the device.
One interesting thing to note is that the DS1019+ has an entirely plastic chassis. This makes the device feel cheaper overall, but being as it will be sitting in a closet somewhere, probably isn't a big deal.

The device also supports up to two M.2 NVMe SSD chips, accessible via the bottom of the device. If installed, these are used purely for caching and can't be added to your overall storage usage. Using one SSD will improve the read cache, while installing two will improve both the read and write cache. I haven't had the opportunity to test this functionality, but according to the documentation, every 1GB of cache will use 416KB of memory, meaning 256GB of cache will require at least 104 MB of system memory.
The product line used to be easy to decode by simply looking at the name, but things have become more complex in recent years. The DS1019+ has an Intel Celeron J3455 processor to support better video transcoding, but the DS1618+ has a quad-core 2.1GHz Intel Atom C3538 processor with on-chip AES-IN encryption. In performance tests, the Atom usually beats out the Celeron, but according to Synology engineers,
"J3455 has embedded graphics to provide sufficient power for high-resolution video transcoding capability (which also reflects on its price)."
Read another way, the DS1019+ was made for video, while the DS1618+ was made for for small and medium businesses (or home power users) who want more drives, RAM, Ethernet ports, PCIe slots, and the like. Synology has apparently abandoned the "play" line and uses the "+" line for both video and high performance devices.

There's still a way to decode the product based on the name. The first two letters tell you if it's a standalone device (DS), a rack-mountable device (RS), or an expansion bay (DX or RX). The second two numbers indicate the maximum number of drives that the device supports; in our case, the DS1019+ supports 10, the five built-in drives and a five-bay expansion unit. The next two numbers indicate the year the device was released, and the last piece tells you what the device specializes in.
Hardware Installation
The whole point of a NAS device versus building your own is in its simplicity, and the DS1019+ delivers. Simply plug in the power cable, connect an Ethernet cable, turn the box on, and you're done.

Connecting drives to the DS1019+ is as easy as the other Synology NAS devices I've reviewed in the past. Place the 3.5" disk in the sled, click the two side pieces into place, and the disk pack is ready to insert into the NAS device. It's a great design, although I'm a little concerned that if the plastic clips on the side break you'll be out of luck and will have to contact Synology for a replacement. That said, I've swapped drives in quite a bit during my tests and I've never run into an issue.
The sleds also support 2.5" drives, such as SSD, but in order to mount those into the sleds you'll need to screw it into the bottom of the sled with the included screws.
I did find one minor quibble with the drive sleds. Other Synology models I've reviewed are spring loaded, where you press bottom of the insert, it clicks out, and then you pull the drive out. The DS1019+, on the other hand, is not: To get drives out, you simply put your finger under the bottom of the insert and pull out. It works fine, but to me, lacks the premium feel of previous devices.
If you want to lock the drives into place to stop someone from simply ejecting it from the enclosure, you can use the enclosed keys to do so, just keep in mind that the locks do not appear very difficult to bypass. I suspect it's not there for hard core security as much as to prevent a passerby from pulling the tray out.
Initial Setup and Installation
There's really not much to say about this that hasn't already been said in previous reviews. Once you turn the DS1019+ on, use the Synology Assistant to locate the device on your network, point your web browser to the interface, and click ok a few times. When the OS installation is complete, create an account, decide if you want to create a QuickConnect ID so you can easily access the device remotely, and you're dropped into the interface.
From here, create a disk group, a volume, and then put shared folders on top of that. The whole process can be completed in under 10 minutes, although the device performs parity checking in the background that, with five large disks, can take hours to complete.
Performance
Since the DSM operating system controls the interface and overall ease of use, there's not much difference between models. Performance, on the other hand, is dependent on the actual hardware so there are always differences between the different releases. Although I'll dig into the specifics below, I'm happy to say that the DS1019+ has the best disk performance of any NAS device I've tested, outside of the Thecus N7710-G utilizing a 10GBe card.
As with all of my NAS reviews, in order to test performance and bypass the PC as much as possible, I used OSFMount to create a 4GB RAM disk and then used Robocopy to test throughput between my desktop and the DS1019+. The volume on the Synology DS1019+ was created as a SHR using the Btrfs filesystem. This is similar to a RAID-5 configuration, whereby one disk is used for redundancy.

My first test is copying large, 3GB files to and from the NAS device. Copying a large file is easier for a disk because the drive can read and write sequentially, so performance is always better with these types of tests. The DS1019+ was able to both read and write at an impressive 113 MB/s, which is pretty close to the theoretical maximum speed of Gigabit Ethernet.
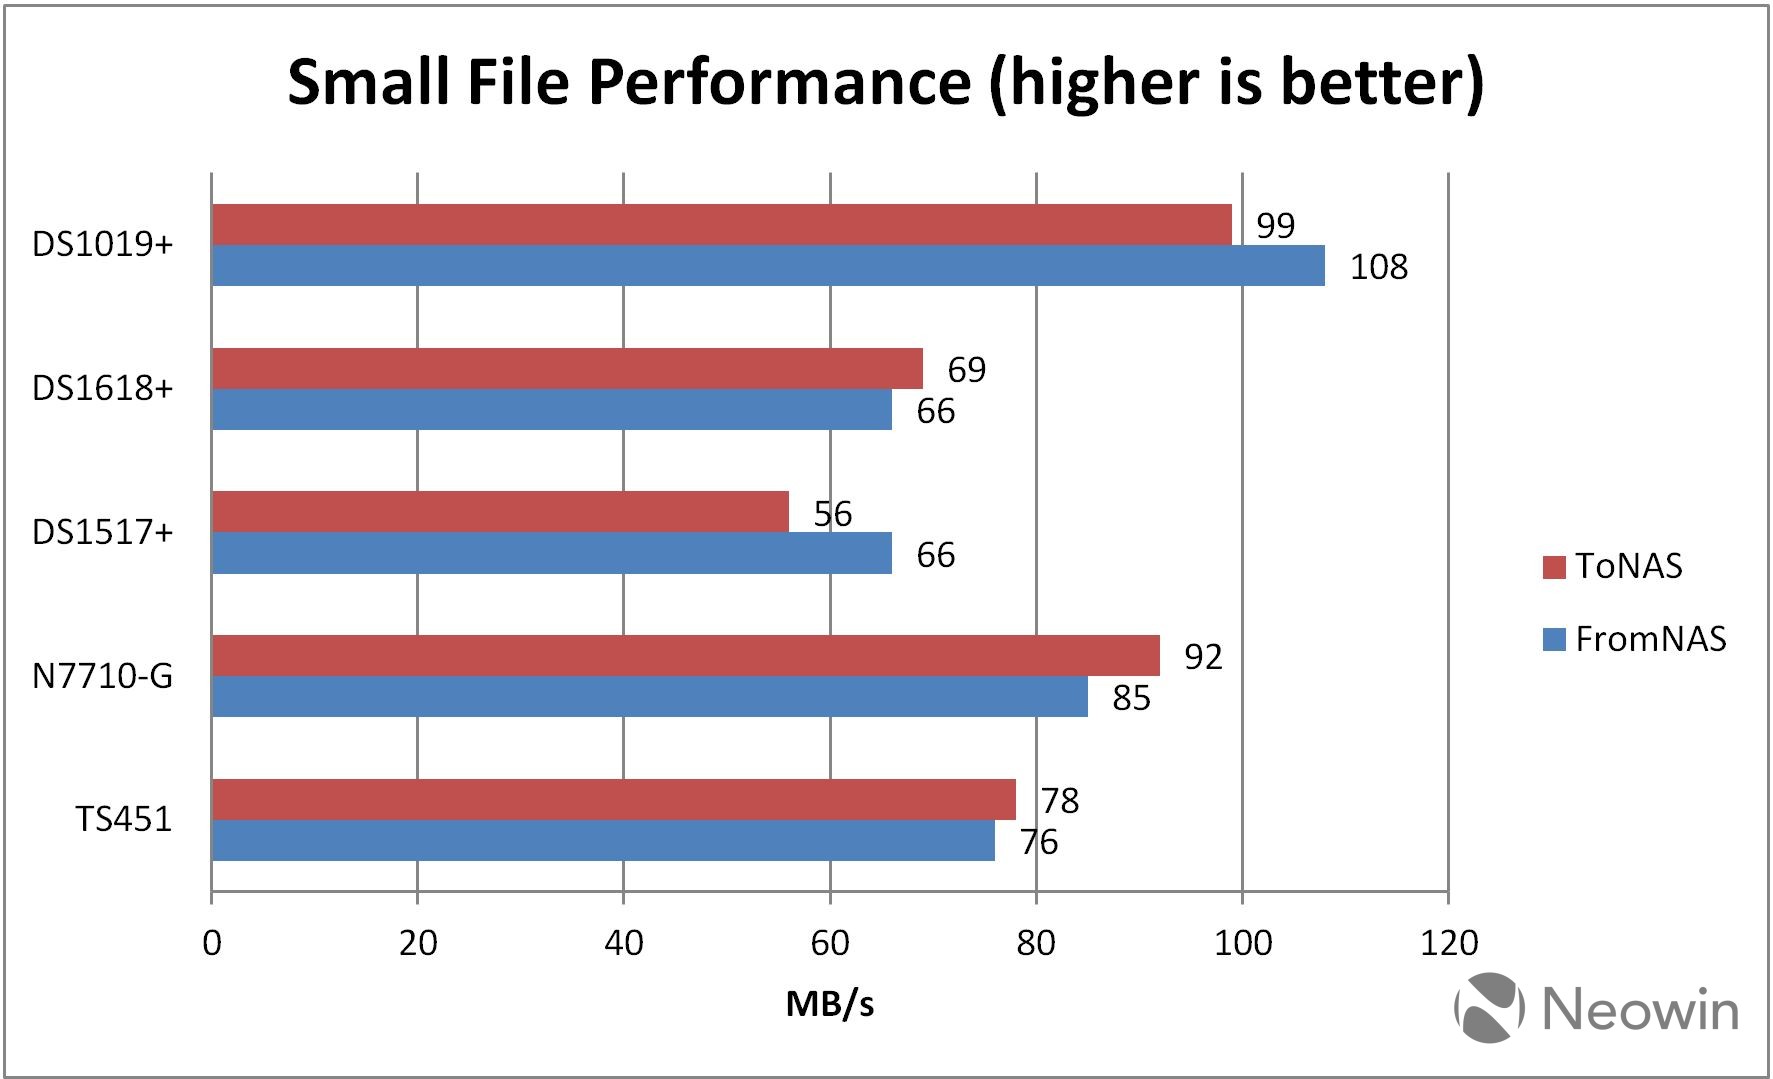
Where things became a little more surprising was in the small file test. Here, I copied roughly 3GB of small MP3 files to and from the NAS device. Generally performance in this test is significantly slower, with only the previously mentioned Thecus N7710-G even keeping close to the large file performance. In this case, the DS1019+ managed to absolutely destroy the competition, giving us speeds of 108MB/s when reading from the NAS and a still-dominant 99 MB/s when writing to the device.

Synology devices also have the ability to do link aggregation to provide more throughput to multiple streams (as opposed to doubling a single stream), assuming your switch supports this.
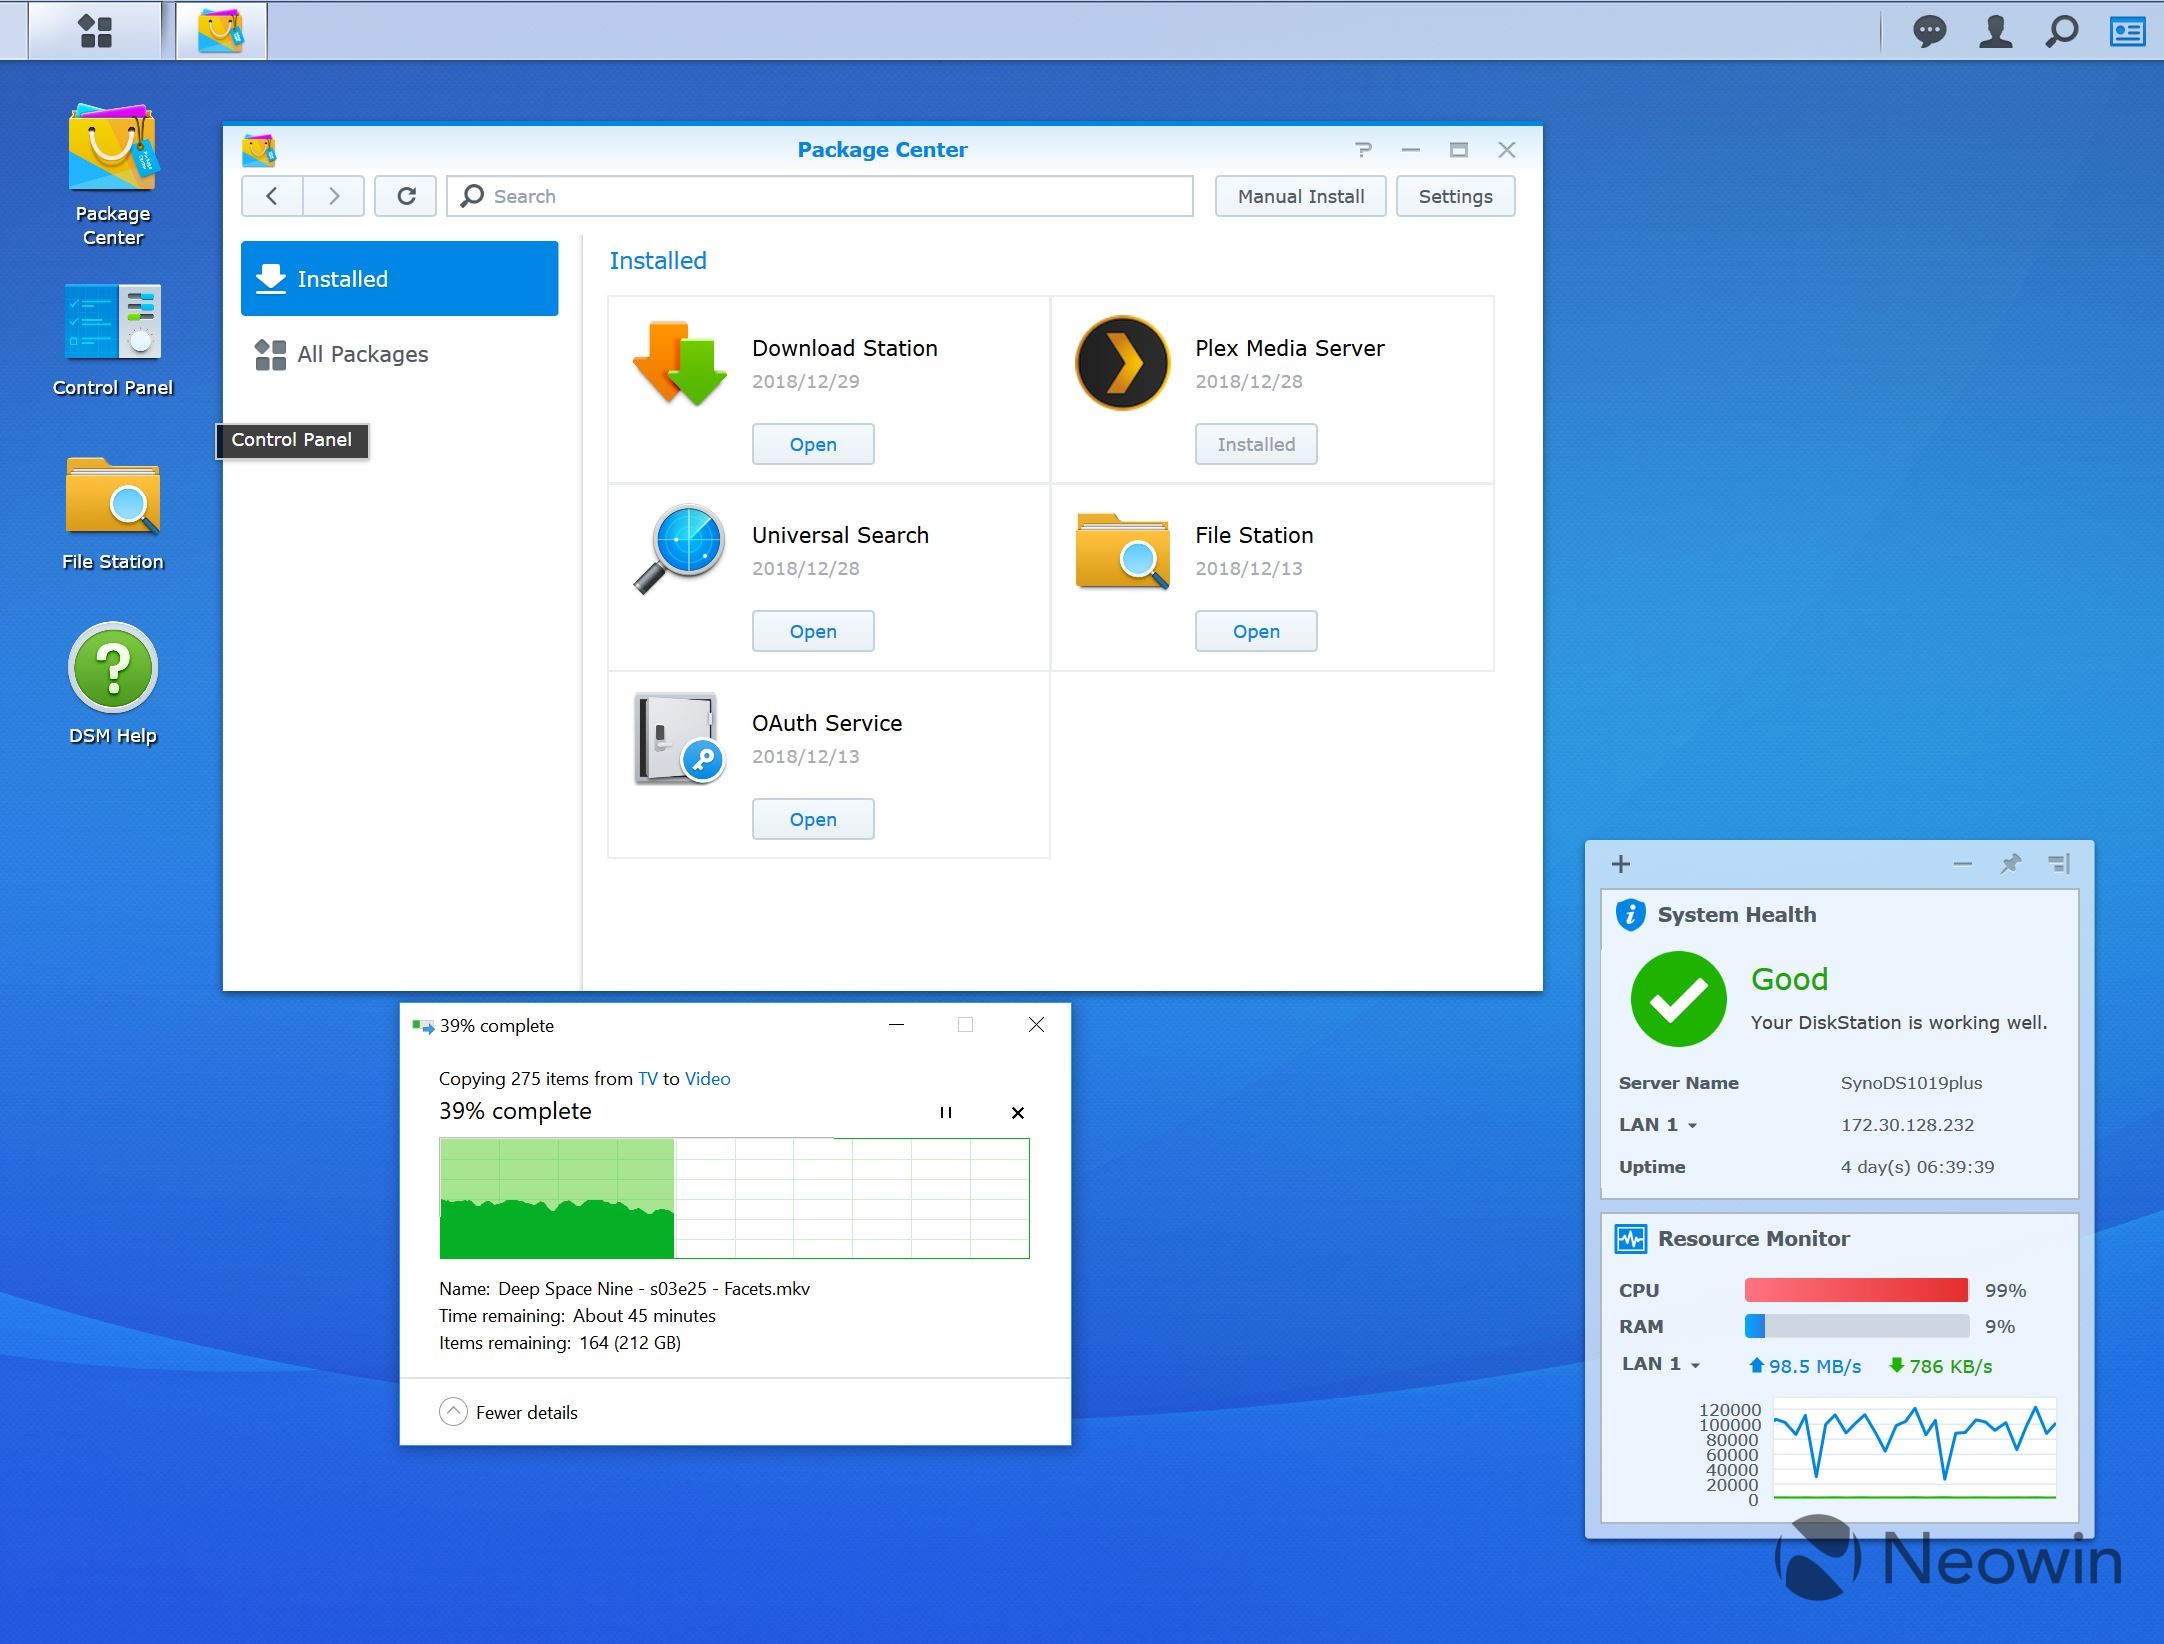
While I don't have a lab capable of officially testing this, I did setup link aggregation and ran a real-world test. Using Plex (which will be discussed later), I attempted to stream Incredibles 2 in HD to the Xbox One, Venom, transcoded from HD to 480p to an Essential PH-1 phone, Star Trek: Deep Space Nine in standard 480p to my Windows desktop, and copy roughly 400GB worth of files from my Windows desktop to the NAS. Although this work taxed the CPU, everything ran perfectly with no buffering issues on the three videos and with acceptable performance on the copy. Benchmarks are one thing, but real world tests like this show that the DS1019+ has some good power behind it.
Disk Management
When things are setup and working smoothly, Synology devices are great, but what happens if there's a disk failure? Luckily, DSM handles this type of issue extremely well.

For my test, I started with five disks of different sizes (two 4TB drives, two 6TB drives, and one 8TB drive) in a Synology Hybrid RAID (SHR) configuration.
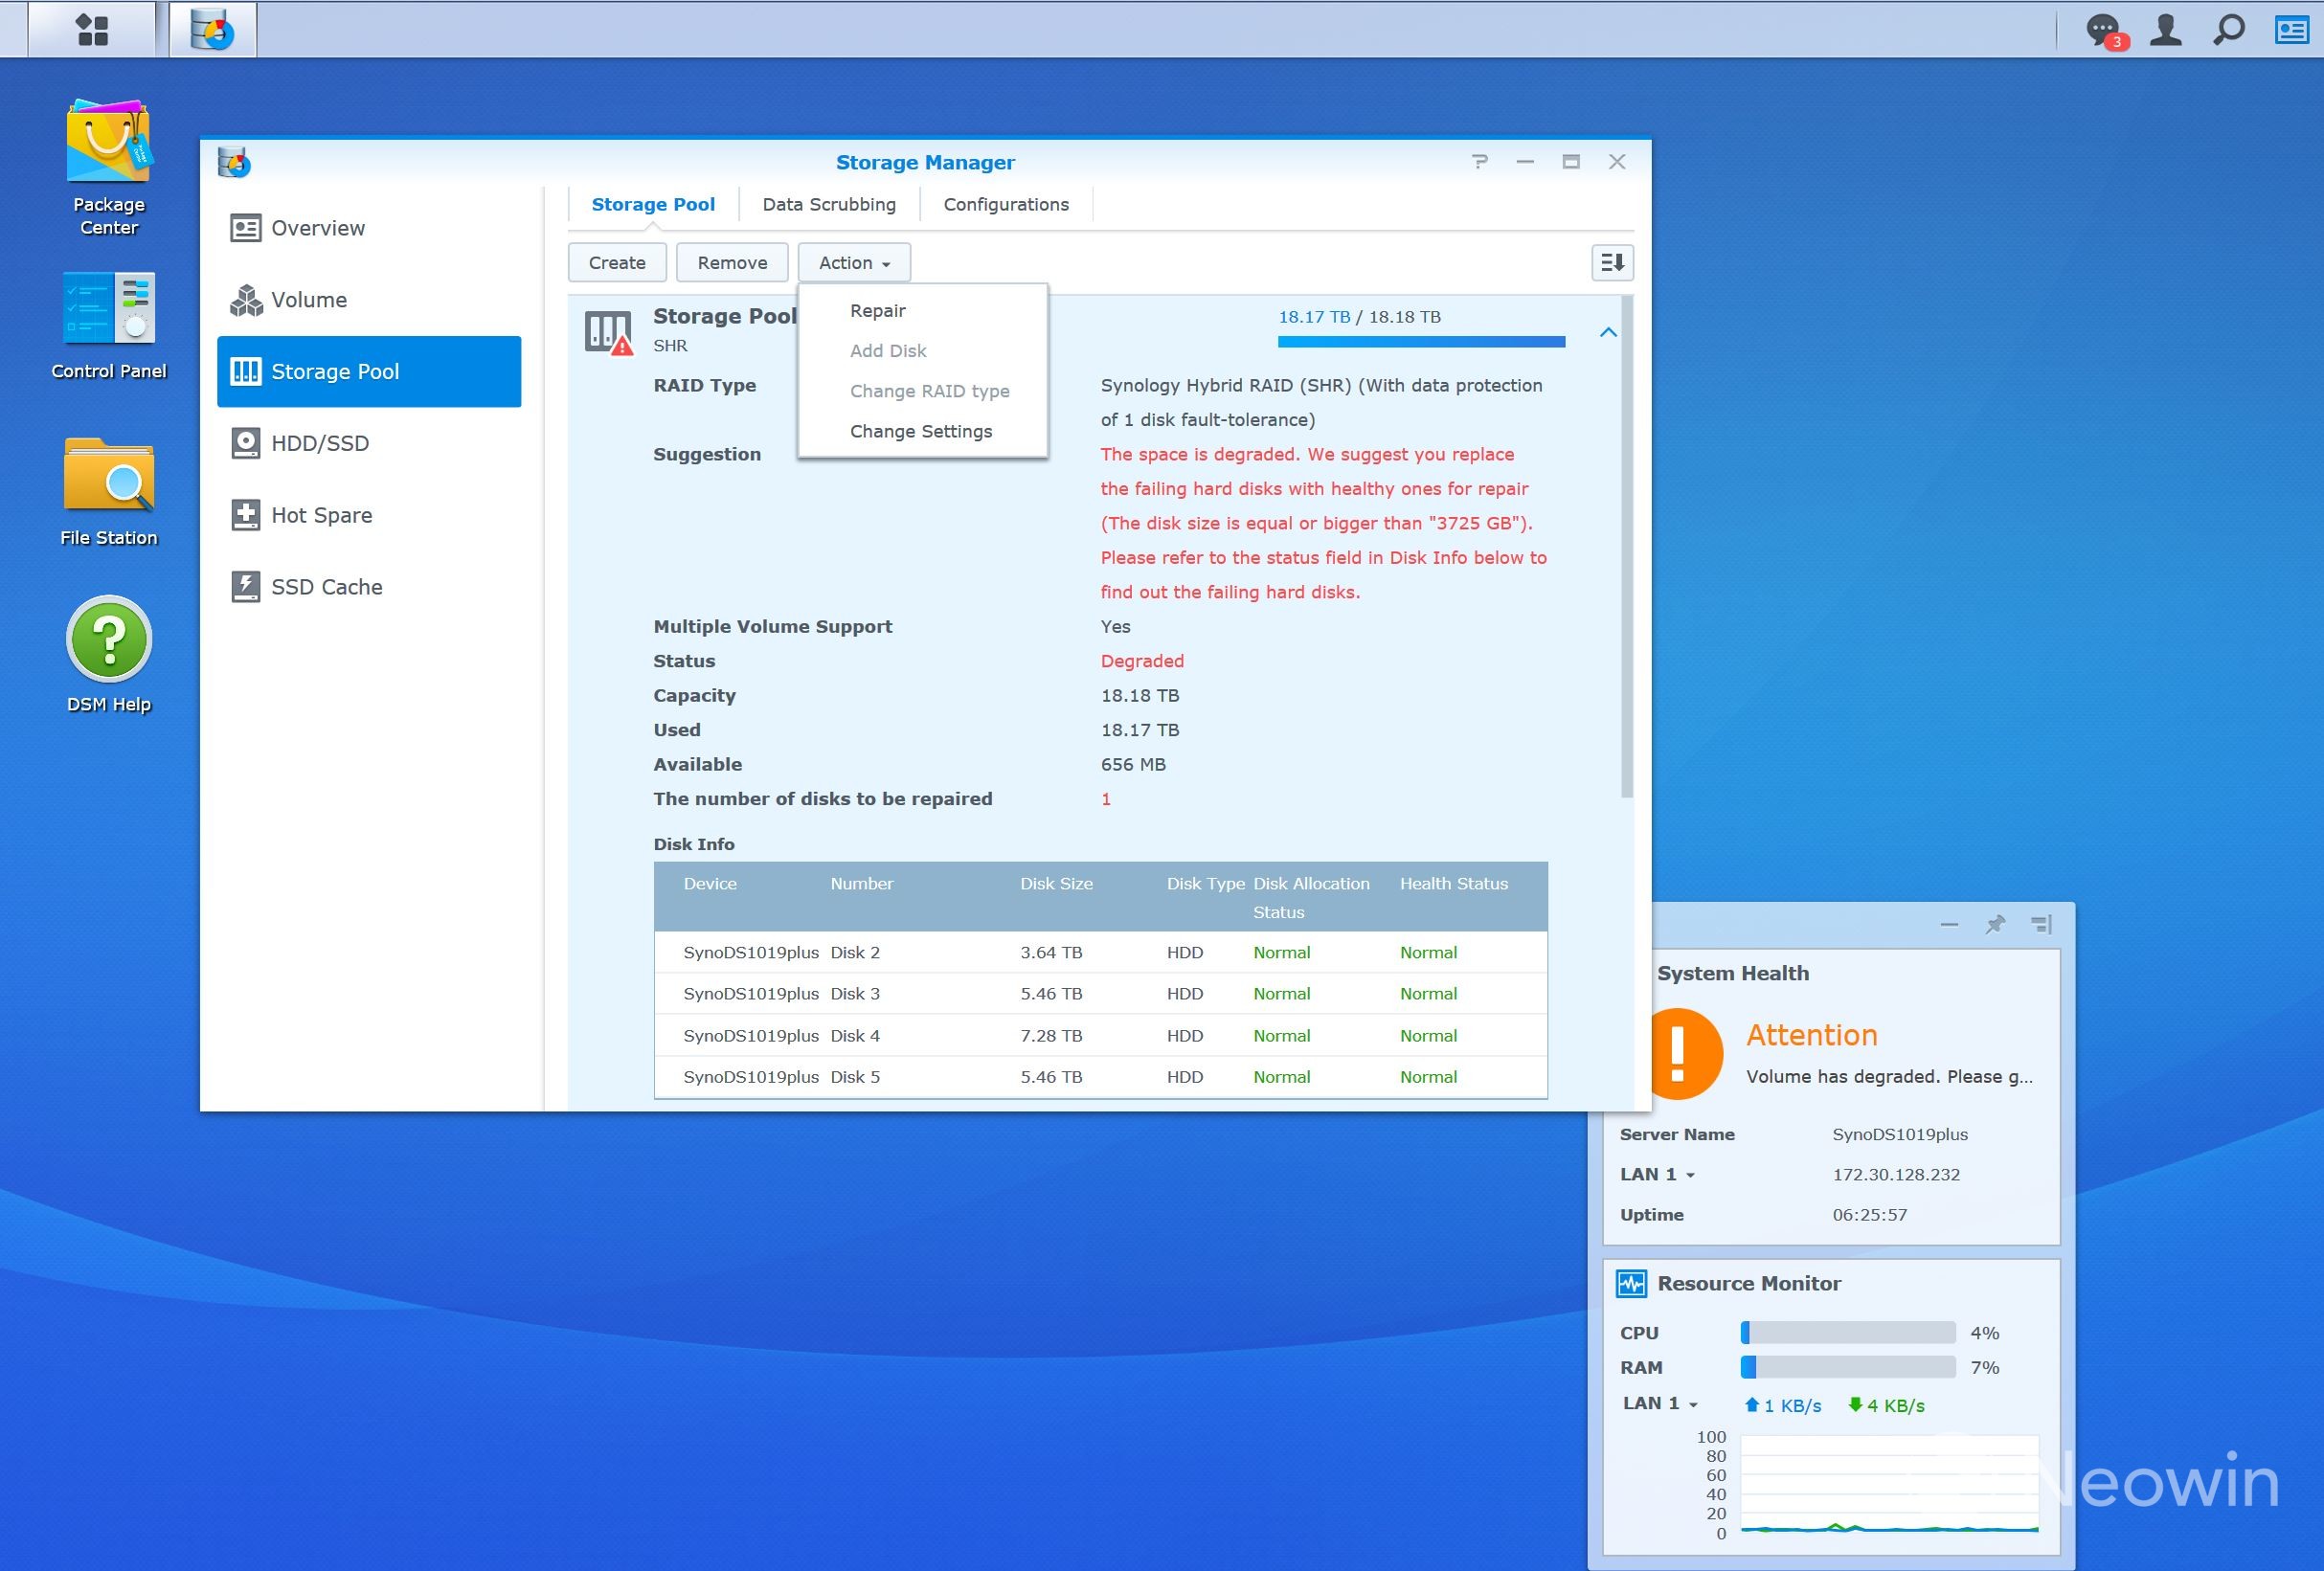
In order to simulate a disk failure, I pulled one of the 4TB drives from the array to see what would happen. As expected, the DS1019+ started beeping loudly and an error message displayed on the DSM interface. At this point, my volume was in danger because another disk failure would corrupt the entire array; if I were using SHR2, I would have protection from a double disk failure.

I then inserted another 8TB drive to replace the "failed" drive, opened Storage Manager, selected the pool, and clicked the "Repair" button. I was presented with a short wizard that displayed the new drive and, after clicking next, warned me that all of the data on the drive would be destroyed if added to the pool.

After acknowledging the data destruction, the new drive was put into the pool and a consistency check was performed. Although this process can take hours, you can still use the NAS device with a minimal performance impact.
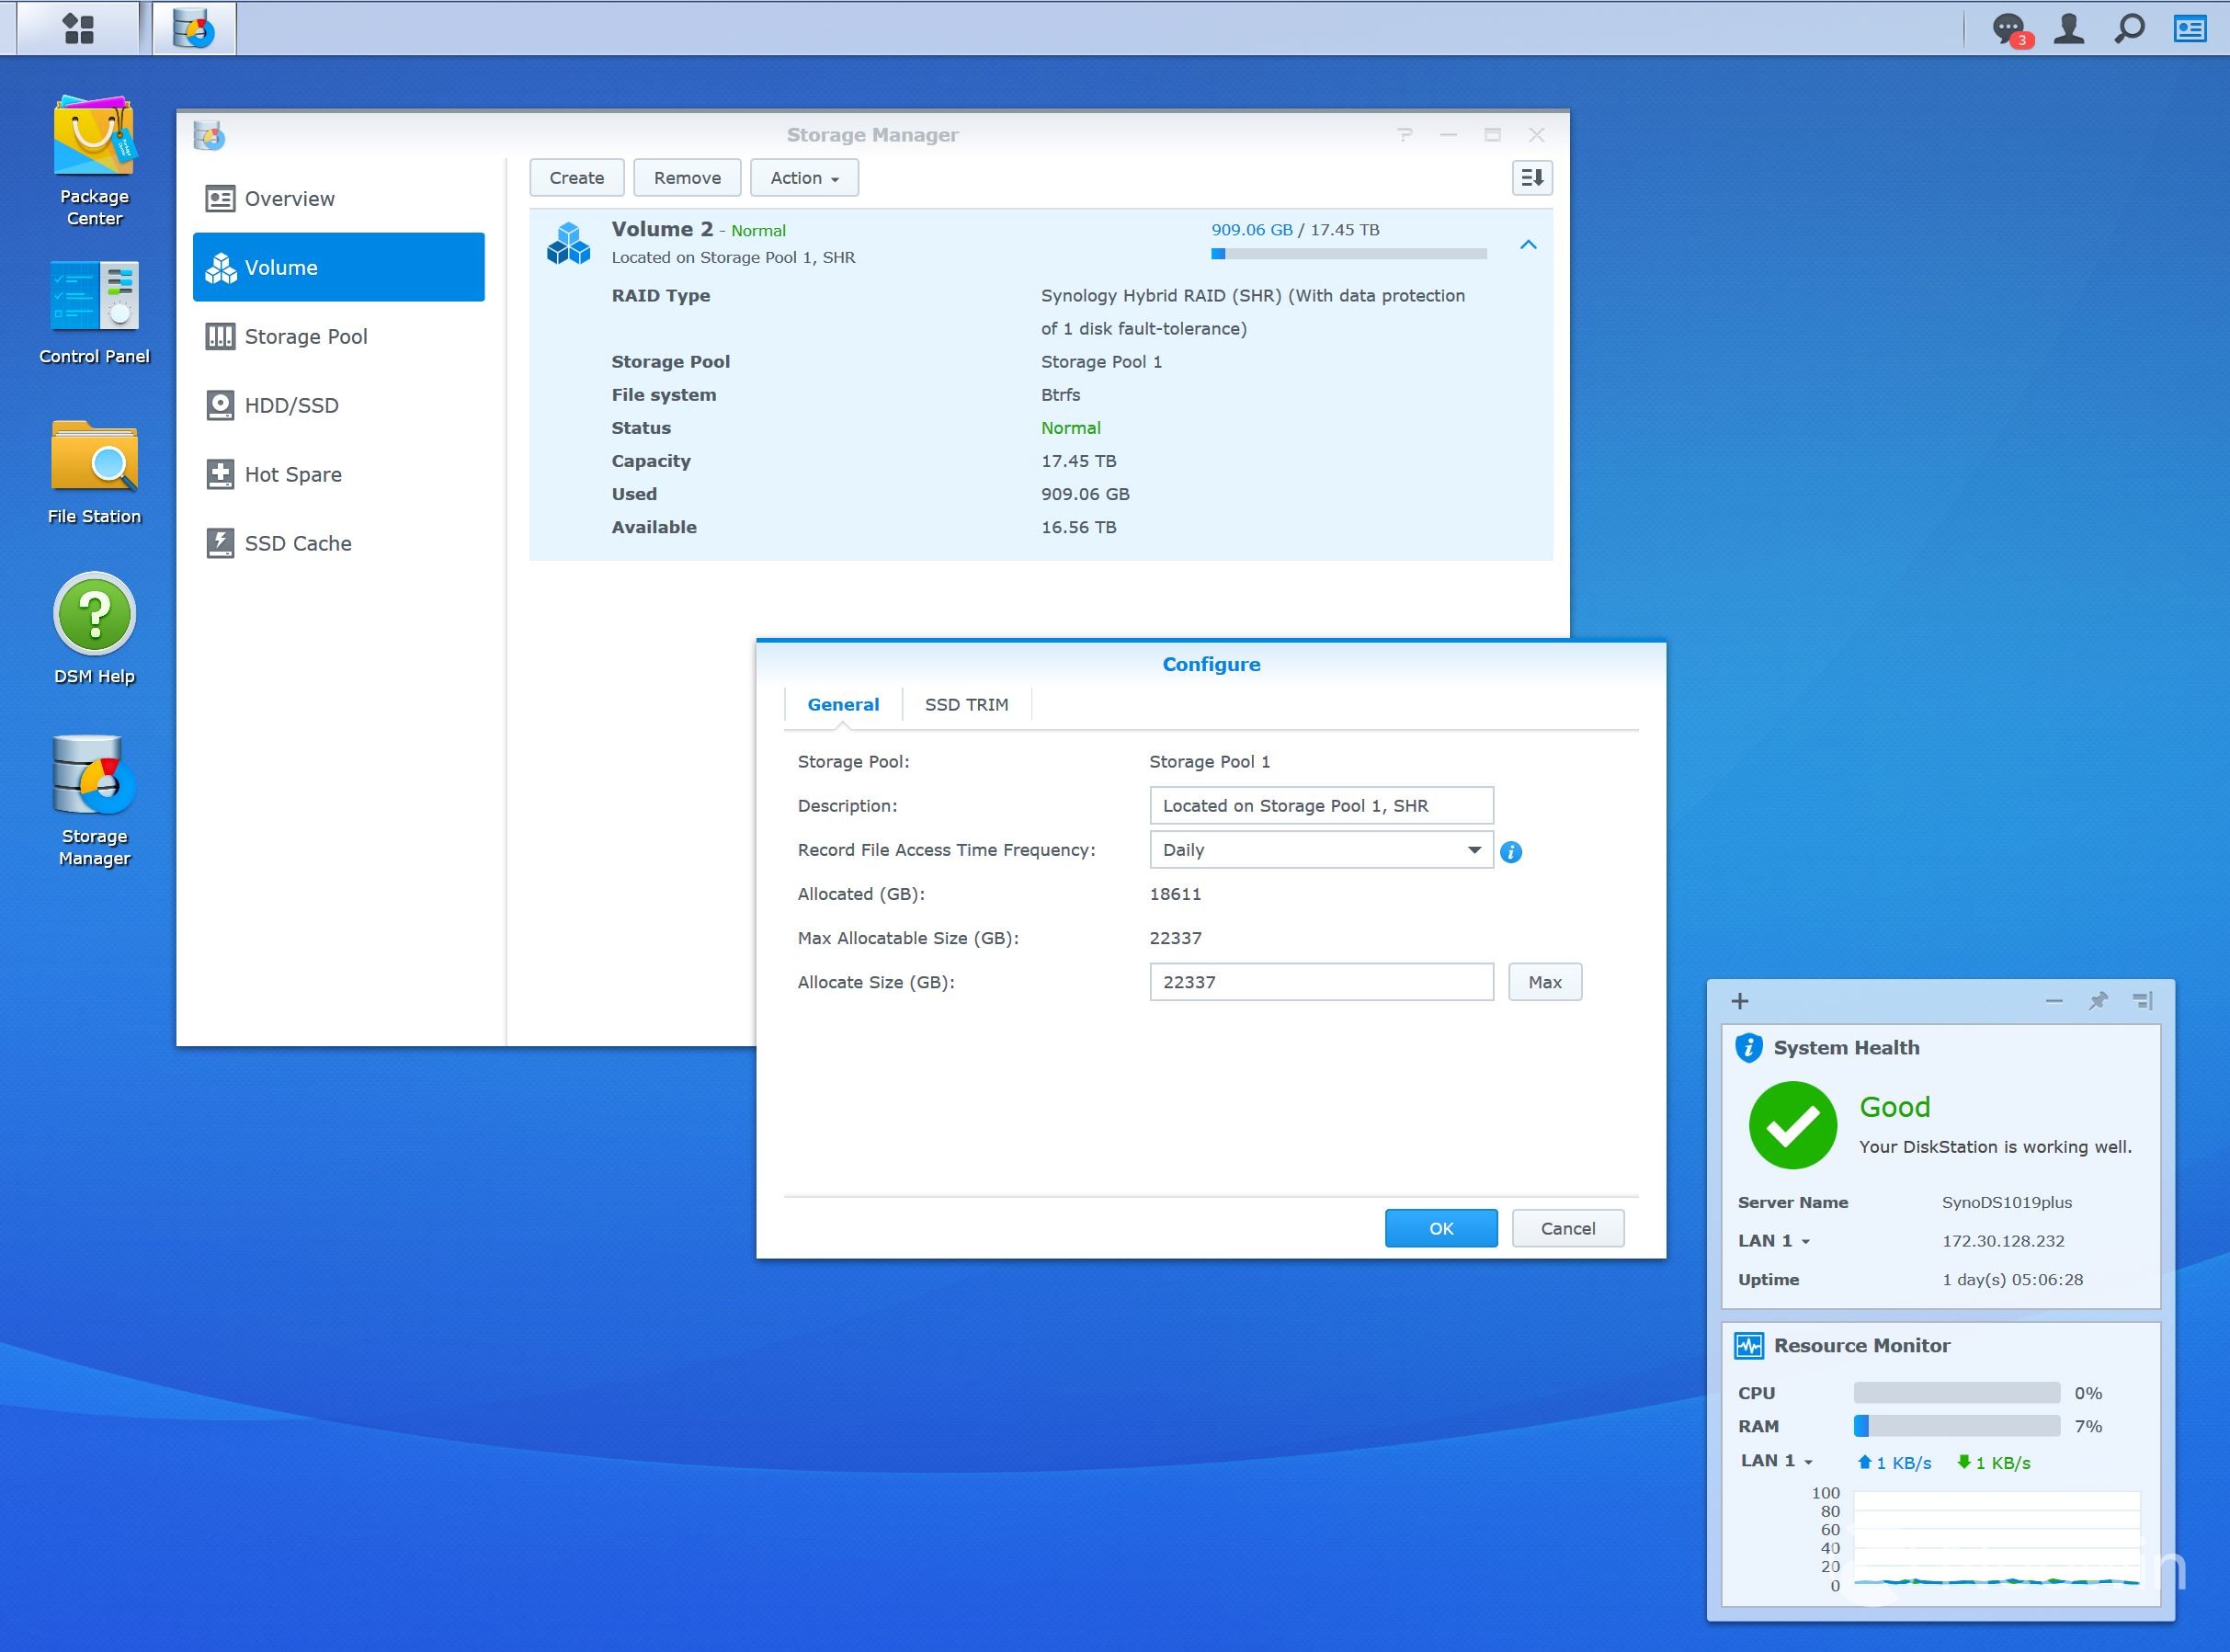
Finally, to make use of the extra space, I selected the volume and expanded the action tab. One of the options on the menu is to use the maximum amount of storage available and with the click of a button, the volume was extended.

I should note that this process is documented on the Synology website. Overall, I've found the Synology online knowledgebase to be extremely useful, as are the public forums. For example, the company has a RAID calculator that allows you to select what drives you want to use in a NAS device, what protection level you want (SHR, RAID-6, etc), and the tool tells you how much usable space, wasted space, and protected space your array will have.
Plex Configuration and Utilization
Sure, you could just use your Synology NAS as centralized storage, but then you'd be missing out on a lot of other features that it has. We've looked at some of them in the past, such as using it to store video from your security cameras with the Synology Surveillance Station application. We've also explored office tools as well as photo management with Office and Moments, and backup capabilities with Hyper Backup and the C2 cloud platform. Today we'll dig into the ever popular media management tool, Plex.
You can download Plex from the Package Manager within Synology, but I found that the version there was a little behind the most recent. In most cases, this is probably fine, but for my testing, I went to the Plex website and downloaded the Synology package directly from the source. It's important to note that although I ran my tests on Synology, I suspect you'll see similar results from any similar NAS device, and that Plex has pre-made packages for all of the major NAS players like QNAP, Thecus, and TerraMaster.

After installing the package, either through Package Manager or manually, you can connect to your new Plex server. Doing so opens up a new web browser (or tab) connecting to (the default set) port 32400, and you're greeted with an introduction page, then asked to create or login to your account.
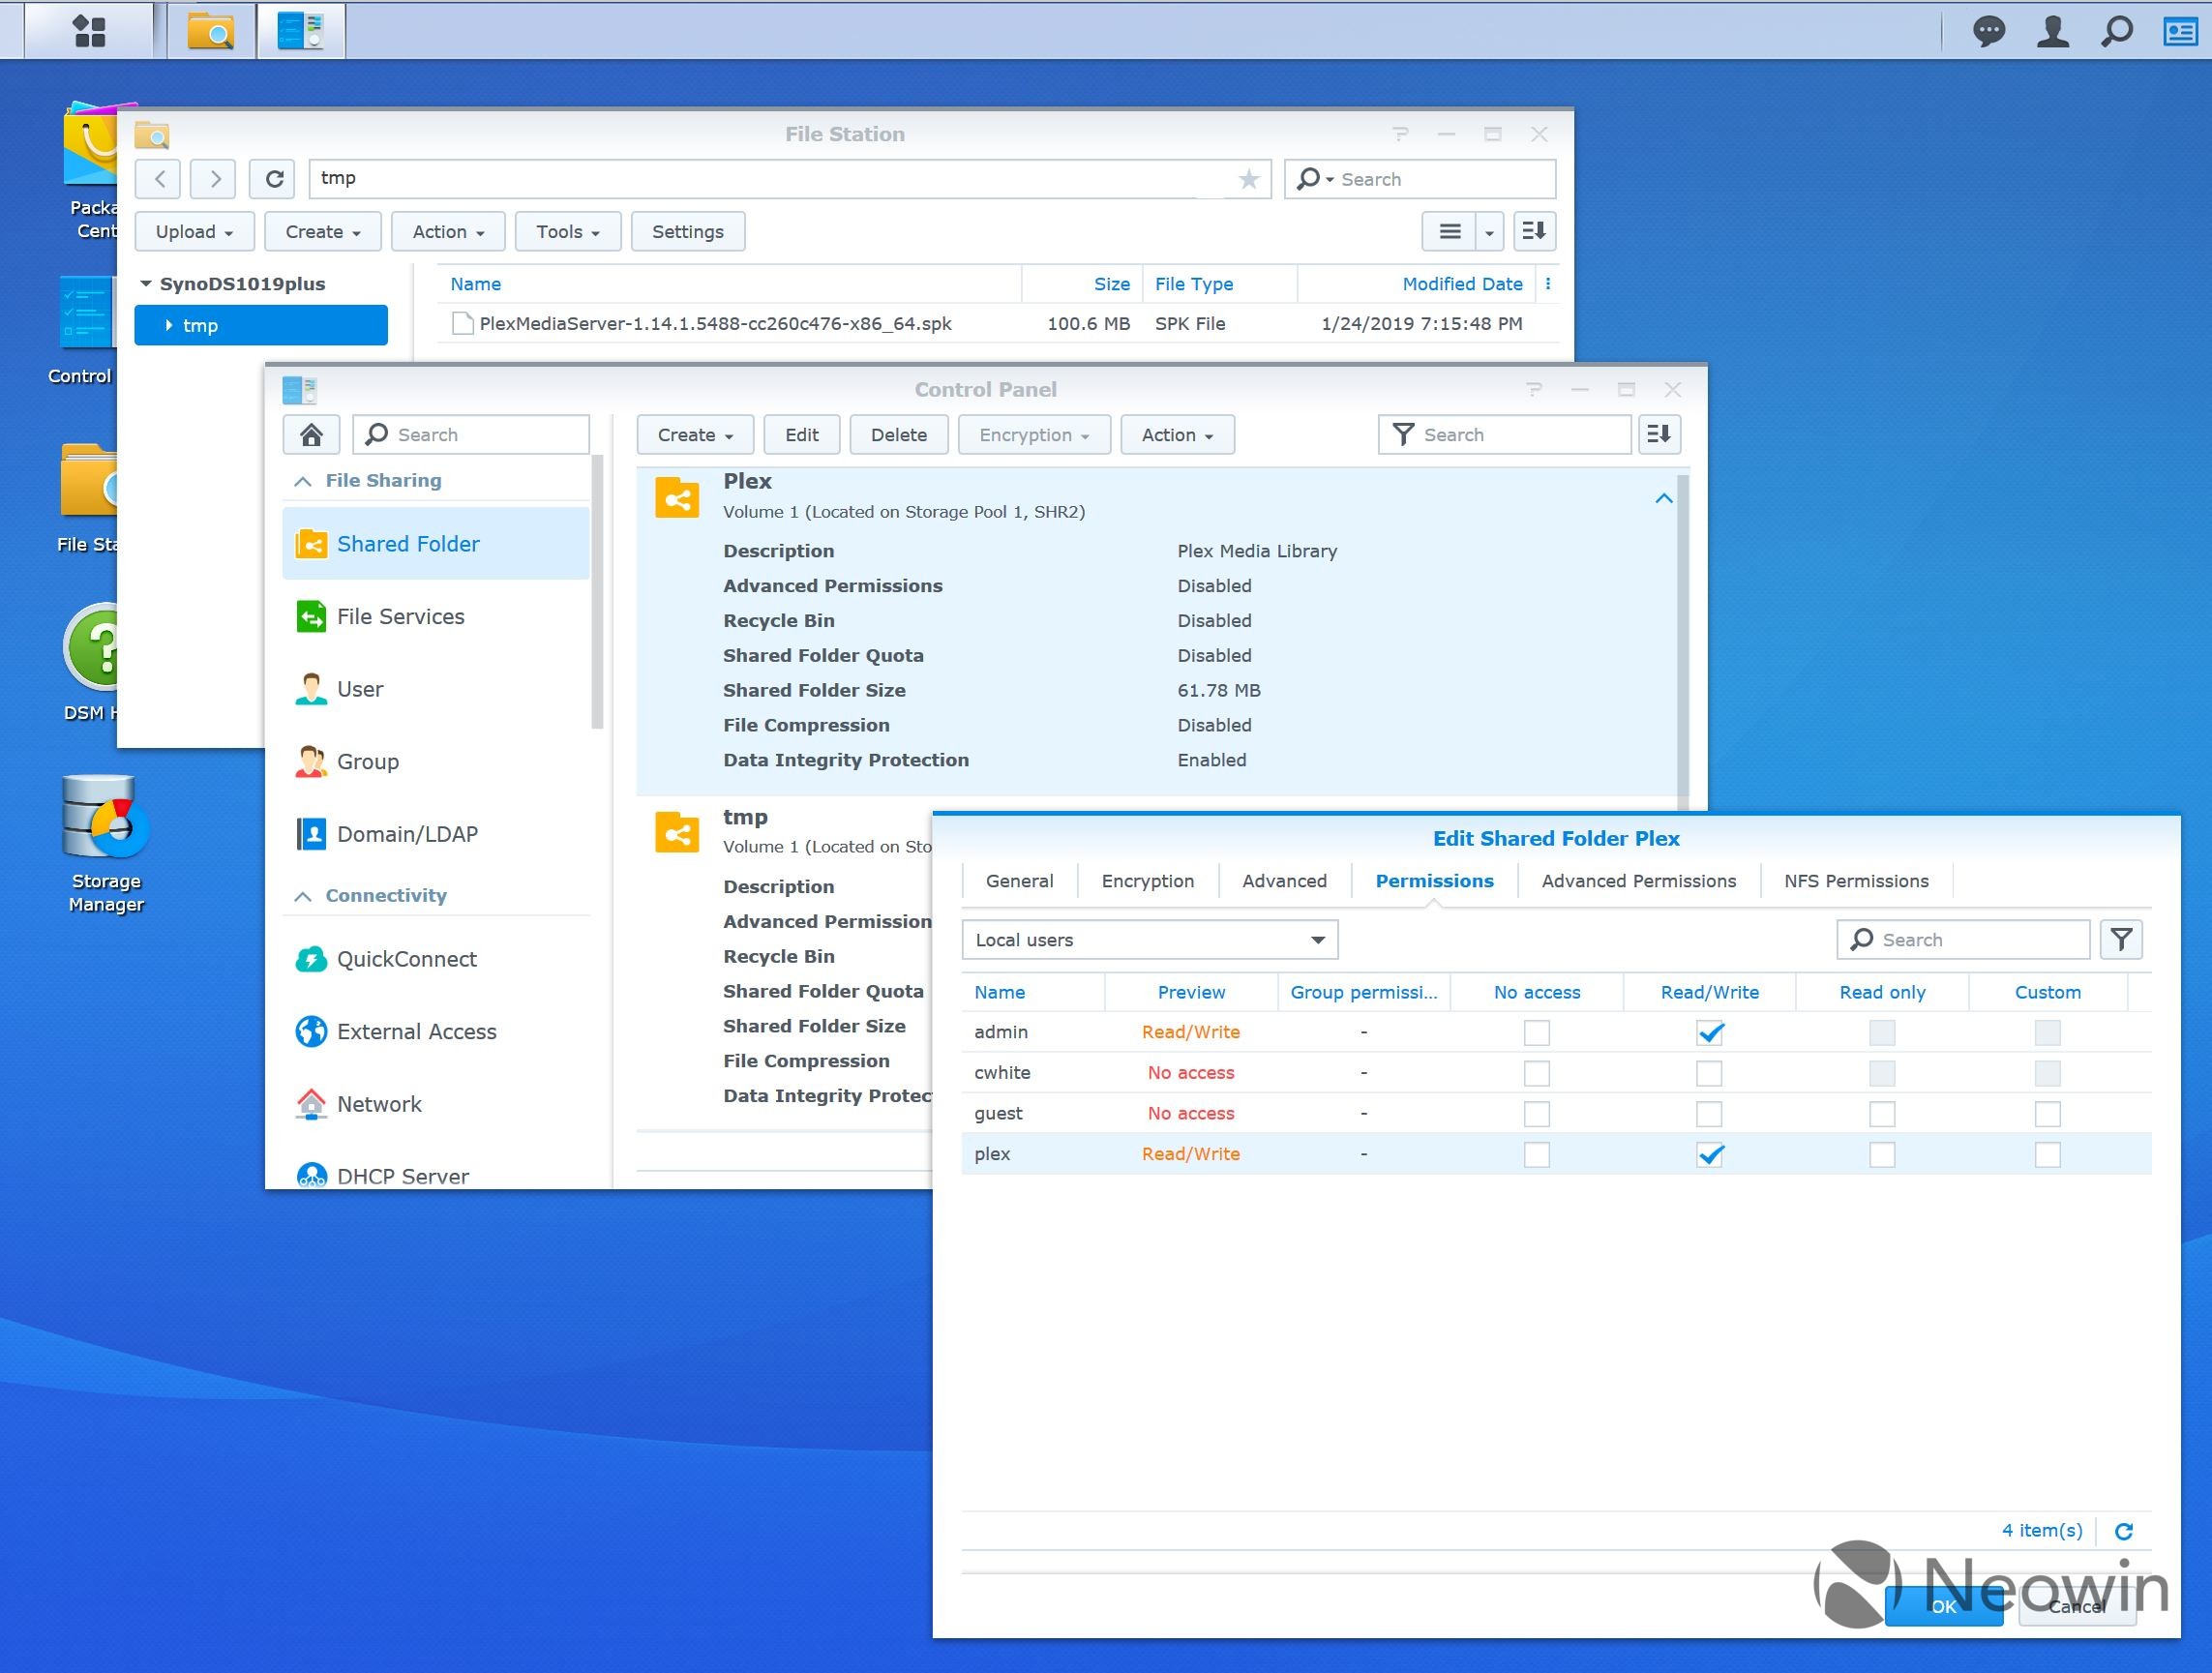
The first issue I ran into, and it appears to be a common piece of confusion because there were many articles about it online, was "where do I go to upload video files to Plex?" I was able to see a volume labeled Plex within the control panel, but couldn't find any shared folders to be able to mount on my Windows host so that I could copy files across. It turns out that, by default, nobody has access to view the volume. So make sure you go in and edit the shared folder permissions to open up permissions to the proper users.
Plex organizes media by what they call "Libraries." Each library can have different permissions, and you can have any number of libraries that you want. A common configuration is to have one for movies, one for TV shows, and one for home videos. Plex also supports music and pictures, but I didn't try either of those this time around as I really like Synology's own Moments and don't need the ability to stream music.

Each library can have different agents applied to them, a setup that determines where on the Internet to look for things like trailers, descriptions, photos, and the like. A movie library might look for details at IMDB, while a TV library might look at TheTVDB instead.

Each library has a specific naming convention, and that process can be a little confusing. To start with, all media should be put in a folder with the name of the video followed by the year in parenthesis. From there, you have a few different options. Movies support the following different types of special features: behind the scenes, deleted scenes, featurettes, interviews, scenes, shorts, and trailers. You can either put these special features in the same folder as the main movie and append the feature type to the filename, or you can create subdirectories for each type of feature and drop named files in there. In either case, you have to name them yourself.

TV shows are even pickier in their naming requirements. Each season of a show has to be placed in its own folder, and follow the naming standard, "[Series Name] - s##e## - [Episode Name]" where s## is the season number and e## is the episode number. Things get more confusing when it comes to special features for a season, and there's some disagreement online about how they should be named. Some people suggest putting all special features in a folder named "Season 00" whereas others suggest starting the labeling at episode 101 for the season. I tried both, and preferred the latter because it helped group the features with the season. Sadly, the display only shows "Episode 101" instead of the filename, so you have to look at that manually.
Aside from the naming process, the fact that Plex automatically pulls pictures, descriptions, ratings, and more from the Internet, giving you your own Netflix-like experience, is pretty cool.
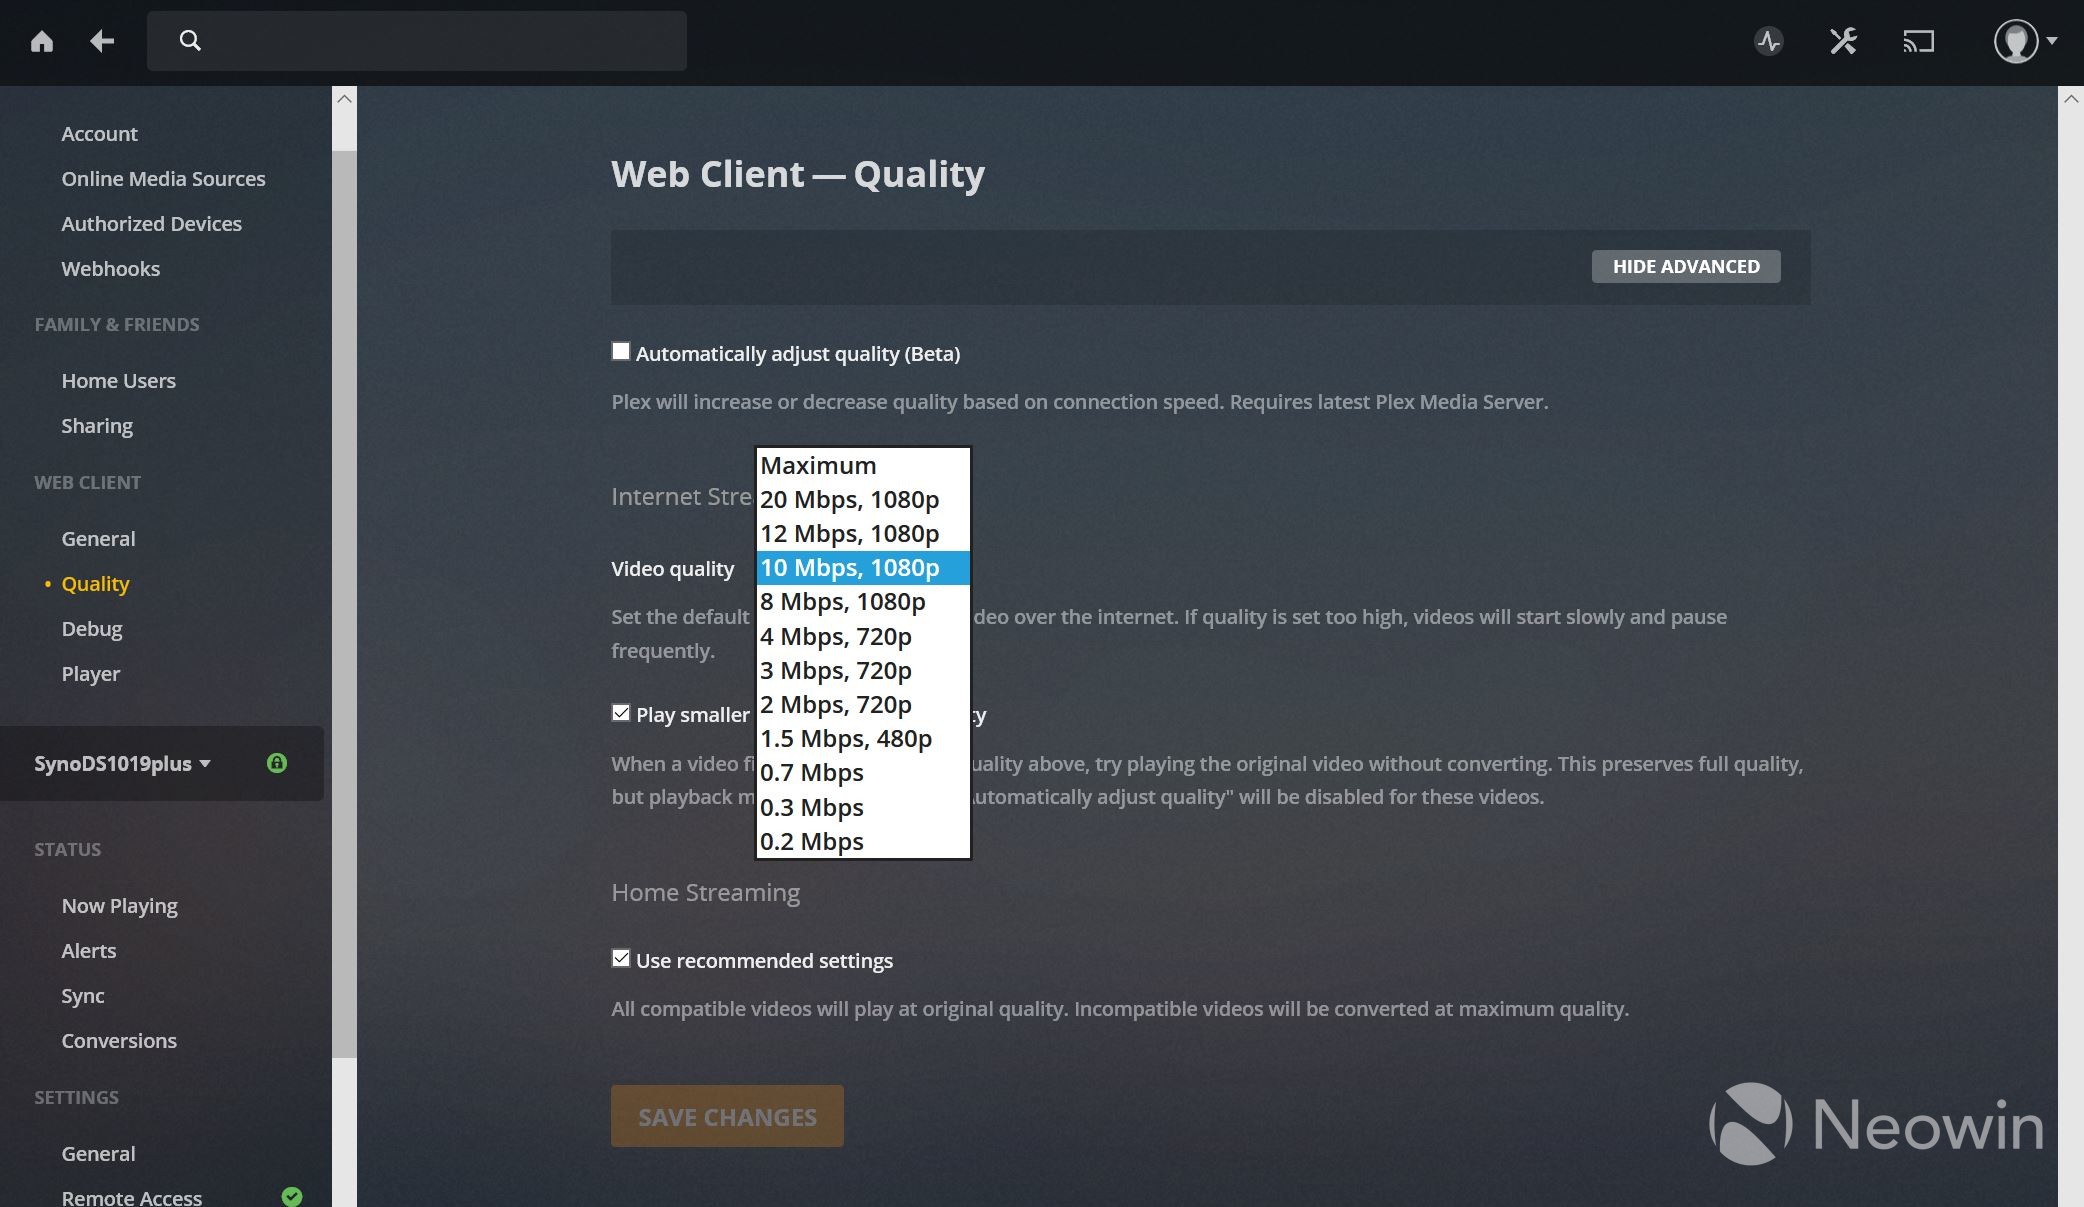
While sharing media within your own house is great, Plex takes it one step further and allows you to stream the same media outside your house, as well as with friends and family. By default, video quality shared outside the home was set to be fairly low. When streaming a Blu-ray movie to an external device, the quality was acceptable but looked to be more like DVD-quality. You're able to modify the quality for both external and internal streams, and once I changed the setting to allow up to 10 Mbps to the Internet, both the picture and audio quality were great, even on a projector.
There are clients for practically any platform you want to connect to the Plex server, from PC to Android to Xbox One and everything in between. Most clients are free, with the exception of Android, iOS, Windows, and even Windows Phone. Although you can provide a PIN number to secure your Plex account when streaming from a device, when doing so on a console, everyone in the room can see what you're typing. It'd be nice if Plex adopted the same method for inputting the code as the Xbox does: mapping each number to a controller button.
Finally, Plex also offers a paid version of the service. Dubbed "Plex Pass," it gives you extra features such as automatically finding movie trailers and other extra features on the Internet, applying lyrics to music, and allowing you to record live TV. The cost is $4.99 per month, $39.99 per year, or $119.99 for a lifetime subscription, and it lets you use the mobile and Windows apps for free.
There's plenty of other features I haven't even looked at available with Plex, and I may conduct a deep dive on the application in the future if our readers have an interest in it. Everything I attempted to run on the Synology DS1019+ ran great and the overall experience was smooth and flawless.
Conclusion
I've reviewed a lot of NAS devices over the years, but I was surprised at how much I loved the Synology DS1019+. First off, the performance really surprised me as it was, by far, the fastest device I've tested that didn't come with a 10GbE interface. That performance didn't stop at simple file transfers either, as I was able to easily stream three videos and copy files at the same time without any loss of performance. Combine that with the fact that DSM is not only rock solid, but also smooth as butter and easy to use gives Synology a winning combination.

That said, I have a few minor issues. For the price, I would have preferred to see a metal case over the plastic one. Sure, it probably doesn't mean much, but the metal gives the device a more premium feel. I also much prefer the drive sleds with springs on other Synology models compared to the basic ones that come with the DS1019+. Finally, while five drive bays are great, for a device made for media, I would've liked to have seen six for a similar price, although you can always add an expansion unit if you need more drives.
These are all extremely minor issues though, and have no impact on the day-to-day use of the NAS device. If you have the money and are looking for a top notch device to stream video as well as handle other chores in your house, you can't go wrong with the Synology DS1019+. If you don't have any need for a lot of video transcoding, you might opt for the 6-bay DS1618+ instead, which might not be able to stream as many Plex videos simultaneously, but is still a powerhouse in its own right.


47 Comments
Load the comments and join the conversation!
Read the comments, ask the editors questions, show respect and join the conversation.