A couple of weeks ago, Neowin published a tutorial explaining to how to get your foot in the door of the Linux world. While it briefly touched on the post-installation process, the focus was mainly on installing the OS. With this guide, I want to run through the first ten things that are worth doing when setting up a new system, including installing some popular applications.
If you followed the previous guide, you should have a system running Linux Mint, with all the latest updates. In the following paragraphs, we'll cover what to do next.
Choose and configure the browser

The first thing you should decide upon is what browser you want to use; there’s a very high chance that you’ll be a Google Chrome user, if so head to the dedicated page and download the Deb package suitable for your system, whether that be 32- or 64-bit. Once the download is finished, click the Deb file like you would with a .exe on Windows, and follow the prompts to install Chrome.
Once installed, you can either start browsing right away, or sign in with your Google account; doing so will synchronise all your passwords, bookmarks, extensions, and other settings to the newly installed browser.
Unfortunately for some, Linux Mint comes pre-installed with a somewhat customised version of Firefox by default. To be fair to the Mint team, the customisations aren't overbearing, but you may want to change them. The first thing you’ll notice is the homepage, which shows the latest Linux Mint news and has a custom Google search. I personally like this homepage but feel free to change it.
The second customisation pertains to the search engine. Firefox in Linux Mint ships with the following search engines; Yahoo, Startpage, and DuckDuckGo. Yahoo, powered by Bing search, is the default search provider. The reason for including these search engines is because they provide financing to the Mint project whenever Mint users do a web search. If you want to change to another search engine, just head to the Linux Mint Search Engine page and follow the instructions. Keep in mind that searches using other providers will not help the Mint project’s financial position.
If Firefox and Chrome aren't your thing, there are other popular browsers available for download. Opera, Vivaldi, and newcomer Brave, are all available as .deb packages from their websites. The Software Manager for Mint also includes Chromium, which is the same as Chrome, but lacking some tracking features. There’s also Midori, a lightweight browser good for low-end machines.
Install media codecs (if you forgot to during install)

If you cast your mind back to the installation process, you’ll remember that one of the first screens of the installer contained an option that reads ‘Install third-party software for graphics and Wi-Fi hardware, Flash, MP3 and other media’. If for some reason you didn’t install the media codecs during the installation you’ve got the ability to do that now. Simply go to Menu, then Sound & Video, and hit Install Multimedia Codecs. This will show a dialogue box which will pull in and install the codecs to play all your different media files.
Check for and install any proprietary drivers that you need
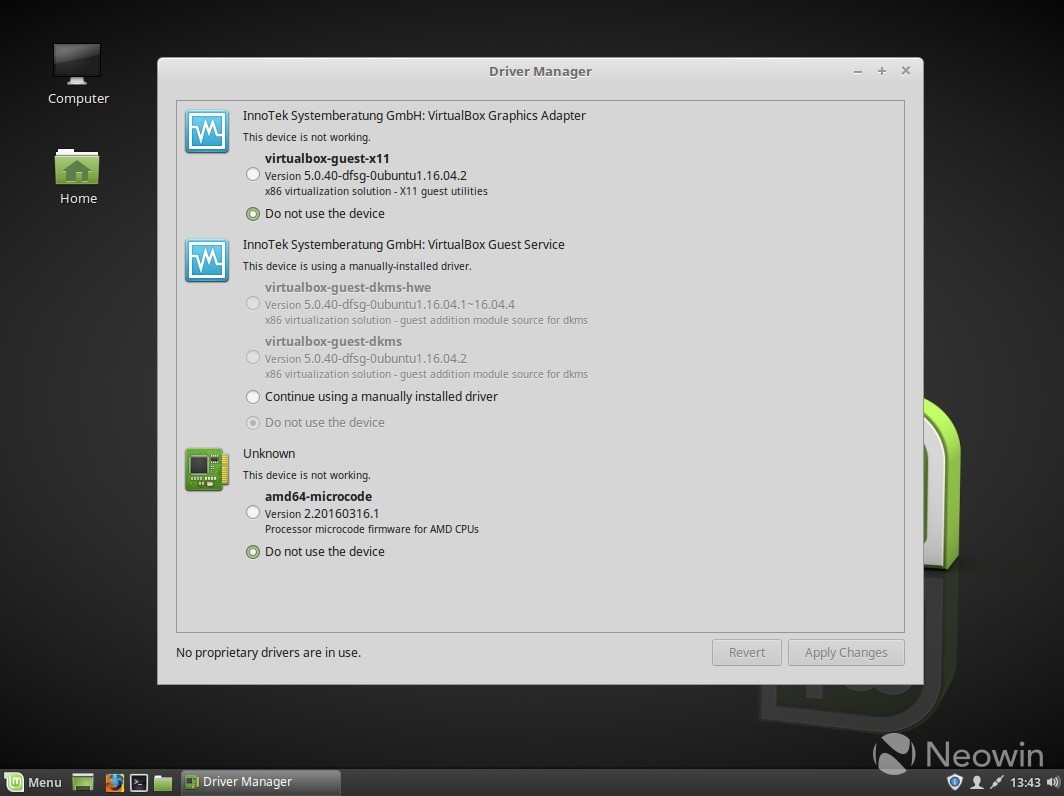
The next thing you want to check for is the availability of any proprietary drivers. Typically, Linux Mint will interface with your hardware via open source drivers, however, in the case of graphics cards and playing games, the open source driver will not suffice. You may have check if a driver is available to install if you found that your wireless card doesn’t work.
To check for available drivers, ensure that you’ve got an internet connection and then select Menu, Administration, then Driver Manager, and enter any passwords when asked. You should see a list of drivers available. My advice is not to install any drivers if your system seems to be running OK, however, if you’ve tried playing games and had issues, try installing any available graphics drivers. Wireless drivers will appear here too, if you’ve got network issues.
Install Steam

To test whether your graphics driver is capable of playing games, I suggest grabbing Steam and running a game to see how it performs. Open up the Software Manager, and then in the search box at the top, type ‘Steam’ without the quotes. You’ll see Steam and Steam (Flathub); go with the former. Once you press install, you’ll be prompted to accept an agreement after reading and agreeing to the terms, press 'I agree' and then Forward and allow the installation to complete.
To launch Steam, press Menu, Games, Steam; the program will then update to the latest version, which could take a few minutes depending on your connection speed. Once you’ve logged in, Steam operates the same way you’re used to on Windows, but take note that not all of your game library is compatible with Linux. You can filter out incompatible games by going to Library, SteamOS + Linux.
If you have any graphics issues with the games you want to play, check the section above on how to switch on proprietary drivers.
Get jamming to Spotify

Playing offline tracks on Linux is very straightforward; you just double tap your media files and they begin to play… but who listens to music offline any more? Everyone’s favourite streaming service, Spotify, is very easy to install on Linux Mint and for the most part, it works normally. If you do notice any issues with it - you shouldn’t - bear in mind that Spotify doesn’t officially support the client and is instead put together by Spotify employees in their spare time.
To install Spotify on Linux Mint, go to Menu, Software Manager, and do a search for 'Spotify', no quotation marks. There are two clients available, Spotify and Spotify (Flathub). The flathub package may receive more updates, however, you may run into theme-related issues at the moment; for example, the cursor may look different within the app. These bugs have been resolved in newer releases of flathub, but the issue still persists in the version shipped with Linux Mint 18.3.
Once Spotify is installed, you should be able to log in and use Spotify as you would on any other platform. It even supports your different devices that are connected to Spotify, such as Google Home, so that’s nice!
Back up your system with TimeShift and Backup Tool

With the release of Linux Mint 18.3, the distribution stepped up significantly when it comes to backing up systems. For a long time, Mint has shipped with Backup Tool, a homegrown piece of software that lets you back up your programs and personal files. However, there was nothing for backing up the system itself. With Mint 18.3, the third-party application, TimeShift was added into the mix.
In order to find TimeShift and Backup Tool on your system, press Menu, Administration, and then select the respective app. Backup Tool is very straightforward to use: just select the options you want, and away you go. TimeShift is also simple to use but does offer more options.
When you first launch TimeShift you’ll be guided through a setup wizard, the first screen will ask whether you want to use RSYNC or BTRFS. By default, Linux Mint uses an EXT4 partition, so be aware that you can not use the BTRFS option as per the notes on the selection screen. Next, you have to select a place to store your snapshots. It’s best to pick an external device for this.
Once you’ve chosen where to save backups, you then need to choose the amount of each type of snapshot you want to store. Out of the box, Daily is the only option picked and TimeShift will save about five backups. I have mine configured to keep one boot back up, 24 hourly backups, seven daily backups, and 52 weekly backups; I believe that works out to having one backup every week for the past year, one backup every day for the past week, and 24 backups for the last 24 hours, and to top it off, one backup for the last successful boot. Hit finish when you’re done.
Change your theme and wallpaper

I’m going to be very honest here, the default Wallpaper on Linux Mint isn't bad, but it’s not great either - and there’s a good chance you’ll want to change it. Luckily, the Linux Mint team has a knack for picking really nice scenic wallpapers for you to choose from. To browse through the options, go to the desktop and right-click, then select Change Desktop Background.
On the left-hand side of the Backgrounds window you’ll see several names. These are the different releases of Linux Mint 18.x, and selecting one will then load up the wallpapers that shipped with that specific release. Once you’ve found something you like, click the picture and voila, you have a new wallpaper.

Figuring out how to change the theme is a little more tricky than the desktop, but still very simple. Go to Menu, Preferences, Themes; from there you can choose the themes for Window borders, Icons, Controls, the Mouse Pointer, and Desktop. The default is Mint-X for the first three options, DMZ-White for the Mouse Pointer and Linux Mint is selected as the desktop theme.
The Linux Mint team have been working on a new theme dubbed Mint-Y, you can test out both the light and dark variants from the Themes menu. Due to the granular nature, you can also do a bit of a mixing and matching.
Save your eyes with Redshift

OK, I’m not really sure whether using Redshift will ‘save your eyes, but it’s a nice tool to have if you’re bothered by the effects of blue light. Unlike f.lux on Windows and Mac, which requires you to go out hunting for the download, Redshift has shipped by default since Linux Mint 18.3. It can be found under Menu, Accessories.
If you’ve got an internet connection, you don’t need to do any configuration, just launch it and it will kick in automatically. If you press the tray icon, you’ll also have the option to auto start it; while this is handy, I’ve found that it struggles to find your location at boot on some occasions, and will not initiate the filter, which then requires you to shut Redshift down and relaunch it. If you want to use it regularly, I’d go to Menu, Accessories, right-click Redshift, and press ‘Add to panel’. It will then be available in the bottom left, next to the Menu button.
Check out useful system tools

One of my favourite things about Linux Mint are the powerful system tools available to users. Aside from the Driver Manager which was discussed above, Linux Mint also comes with System Monitor, a tool very similar to Task Manager; Disks, which allows you to format and partition all your drives as well as write disk images to devices; and the System Info tool which allows you to quickly find out your hardware specs, operating system, and kernel version.
Although not within the scope of this guide, I would recommend having a good look at what these applications can do; specifically, teach yourself how to format USB devices with Disks, and try right-clicking on processes in System Monitor to learn how to kill them (useful when apps misbehave). Once you’ve mastered the mentioned tools, you’ll probably find yourself coming back to them quite often, as they’re extremely useful.
Tweak the system for a better experience

In the last part of the guide, I just want to give a shout-out to the accessibility tools that are available in Linux Mint. Earlier, I discussed Redshift which filters out the blue light, reducing eye strain at night. If you’re worried about straining your eyes, or your sight is simply beginning to fail you, Linux Mint has some extra accessibility options which are useful.
To access the Accessibility settings, press Menu, All Applications, and then click Accessibility. Here you can switch on large text, high contrast, and so on. You can navigate between the tabs at the top of the program too, which will let you enable accessibility features pertaining to Visual, Keyboard, Typing assistance, and Mouse settings.
Closing words
All of the tips I’ve included in this guide are things I do on new installs of Linux Mint; there are a few other programs I grab, such as Stellarium, but by and large this guide covers the main aspects of a decent setup. Depending on your use case, there are probably plenty of other things you'll want to do with your own new installs. Leave a comment below if you set up your systems differently to what I’ve outlined above.


36 Comments - Add comment